
We use our own set of campaign rules "Wings Over Malta". These contain 6 basic missions which will be played with alternate sides as the attacker. They will be played first with "early war" planes and then repeated with "late war planes". This differs from our previous Battle of Britain campaign which was a ladder campaign that followed more exactly the historical battle.
The Background
The RAF sent bombers such as the Bristol Blenheim Mk.I to attack the Italian airfields and disrupt their attack on Malta and on shipping.

The Action
No.369 Squadron was tasked with sending a raid to attack an Italian airfield in order to give the Regia Aeronautica no rest. The squadron was short of both aircrew and aircraft, so the raid only consisted of a single Bistol Benheim Mk.I bomber escorted by a Gloster Gladiator. Pilot Officer Bruce Wayne took the Gladiator and Pilot Officer Brett Sinclair flew the Blenheim.
The raid was spotted by a Regia Marina MAS boat which radioed in the sighting. Thus the Italians had time to send up two of their new Macchi C.200 Saetta (Lightning) fighters to intercept. The Saetta monoplane was more robust than the older CR.42 Falco and Gloster Gladiator biplanes but much less maneuverable. Capitano Vitello Tonnato and Tenente Vittorio Gambetta jumped into the brand new monoplanes and raced out to sea to intercept.

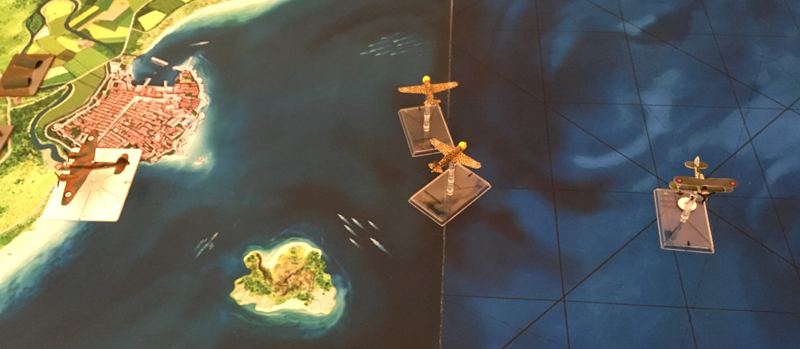
The Italians headed towards the British planes in a tight formation, still trying to learn the maneuverability of their new monoplanes. The Gladiator slowed down, letting the Blenheim take the lead.

The Gladiator climbed to gain height as the Italians closed on the Blenheim.

The Macchi C.200's open fire on the bomber. Capitano Vitello Tonnato makes a lucky shot and wounds the bomb-aimer in the nose of the Blenheim.

The Macchi C.200's manage a last quick burst as they pull back on their sticks and fly over the top of the bomber. The Blenheim's dorsal turret manages a quick burst in return as they fly overhead.
With his second burst, Capitano Vitello Tonnato fires into the nose of the Blenheim and yet again hits the bomb-aimer who is then killed.

The Italians performed an Immelmann turn as the British continued straight on, the bomber diving to escape the fighters.

The Blenheim sped on, chased by, but just out of range of the Italian fighters. It was now the Gladiator's turn to perform an Immelmann.

Realising that they had no hope of catching the Blenheim, the Macchi C.200 fighters turned to attack the Gladiator.

The figthers started dogfighting. The Blenheim had now realized that with the bomb-aimer done for, they had no hope of completing the mission and it was time to get out of here.
The Blenheim turned for home. The Gladiator performed and Immelmann in the hope of catching one of the Italians.

As the dogfight between the fighter continued, the Blenheim dived to get away from the Italians.

The fighters decided that they shouldn't let the Blenheim get away, so they started chasing again. The Gladiator performed an Immelmann to follow the Macchi C.200's.

The bomber pilot decided he didn't want to be a sitting duck, so he turned into the Italian fighters.

The bomber's sharp turn not only confused the Italians, but also gave his dorsal gunner a good shot.

The Blenheim turned once more for home as his escorting Gladiator charged into the fray to help.

The combatants now paired off, the Gladiator againt one Macchi C.200 and the other Macchi C.200 against the Blenheim.

Both Macchi C.200's now ganged up against the Blenheim.

The Gladiator turned in to chase off the Macchi C.200's and protect the Blenheim.

But the Gladiator overshot, and soon the Macchi C.200's were on the Blenheim again.

Before the Gladiator could return, both Macchi C.200's were on fring short range bursts at the Blenheim.

The Blenheim could take no more!

The Blenheim flown by Pilot Officer Brett Sinclair crashed in the sea. Sinclair and his air gunner jumped into their dinghy taking with them the body of the dead bomb-aimer. They were soon picked up by the same Regia Marina MAS boat that had spotted the incoming raid. They were given a bottle of grappa to share during the journey back to port.
Capitano Vitello Tonnato and Tenente Vittorio Gambetta returned to base to celebrate their shared kill and the fact that they had protected the airfield from the British attack. And to top it all off, Tonnato was now an ace, which they celebrated by each drinking a whole bottle of Disaronno Almond Liqueur!
Pilot Officer Bruce Wayne couldn't catch the Macchi C.200's which weren't interested in fighting him, so he returned to base with his tail between his legs.
Result
Italian Victory
- Capitano Vitello Tonnato: ½ Kill
- Tenente Vittorio Gambetta: ½ Kill
- Pilot Officer Brett Sinclair: POW
Campaign Result so far...
0 Country of Dampshire 369 Squadron Auxiliary Air Force
3 Regia Aeronautica squadriglia d'aquila
Notes
ARES has no Bristol Blenheim or Macchi C.200 Saetta models so we used the Blenheim Mk.II from the Skytrex Action 200 range and the Macchi C.200 Saetta (Lightning) fighters from Armaments in Miniature (AIM).
The airfield target cards are 1/1000th scale models from the RAF Fighter Base made by Brigade Models.
No comments:
Post a Comment