Showing posts with label Waterloo. Show all posts

Wednesday, October 19, 2016

Waterloo: the Fight for Hougoumont - Part 2, The Battle

Previous post: Part 1, The Setup

Let battle commence...

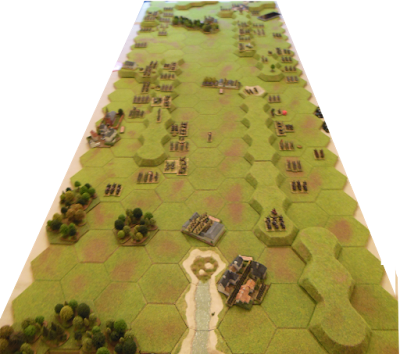
The two sides are drawn up ready for battle

The French advanced with their right flank and opened fire with their artillery on the Nassau light infantry in the woods causing them to retire.

The French light infantry take casualties covering the advance of the columns of line infantry.

The Nassau infantry in the woods, moves over to stop the advance, the Nassau light infantry retreated into the safety of the orchard and Wellington orders forward troops from the ridge to secure the orchard.

The French attack the Nassau infantry so as to clear the wood, while at the same time coming under heavy fire from the British infantry guarding the orchard.
The French take the woods causing the Nassau infantry to rout, but not without heavy losses from defending infantry fire. The Allies have occupied a good defensive position and caused serious casualties, so the advance on the French right flank grinds to a halt.


The French switch their attention to the Left Flank and start by advancing with their Light Infantry to drive the Hanoverian Jaegers out of the woods.

Columns of Line Infantry advance around the flanks of the woods to support the light infantry and approach Hougoumont itself.

Both the Jaegers and the supporting horse artillery take heavy losses but cling valiantly to the woods.

The French charge the horse artillery battery which inflicts heavy losses with canister before being captured.

The way was now clear to attack the Chateau, so the French columns charged, only to be blown away by the accurate fire of the British Guards defending Hougoumont supported by the remaining few Hanoverian Jaeger and flank fire from the infantry in the walled garden.
The Allies had now occupied a strong defensive position around Hougoumont, and the French were so weakened that the could no longer break into the Chateau. 

The Result: 
Wellington's troops still held Hougoumont with a strong force of Scots Guards in the Chateau itself. The French attack was stopped and had to be content with holding the woods, from which they could skirmish with the defenders. The French generals watched the massed heavy cavalry charges off to their right, in the sure knowledge that if the cavalry couldn't break the Allied squares, then the Old Guard would surely crush all resistance before it!

Sunday, October 9, 2016

Waterloo: the Fight for Hougoumont - Part 1, The Setup

The fight for Hougoumont using Command & Colors Napoleonic Rules.

Hougoumont from Irregular Miniatures 6mm scenics range, figures from Baccus 6mm, hex terrain from Kallistra and trees by Timecast.

Details of the scenario can be found here.

At Waterloo, Wellington had little choice but to occupy Hougoumont, for it would prevent the French from gaining the heart of the British position along the ridgeline. In fact, Wellington came close to losing the battle by undergarrisoning Hougoumont.

Opposite Hougoumont stood General Foy and Jerome Bonaparte with three divisions of the French II Corps. The initial attack began around 11:30 AM. The first assault met resistance, but the French infantry forced their way into the woods. As they came out on the other side, they were forced to fall back from the intense fire from the buildings and walled garden. The second assault gained a small lodgement, but the attackers again were driven back. A third attack breached the gate of the walled farm, and only the heroics of local Guards commander MacDonell and a small force succeeded in closing the gate and wiping out the attackers. Despite the success of the defenders, the crisis was not over yet, for Foy’s Division joined the attack around 1 PM and gained the orchard. The Scots Guards then counter attacked from the ridge and drove the French out of the orchard. The orchard was attacked again in the late afternoon, but the British had reinforced the position and the attack again failed. The battle for Hougoumont was all but over by 7 PM.

The Battlefield from the French side
The Game Layout

The French Left
The French Right
Hougoumont Awaits

Defending the Walled Garden

The Allied Left

The Allied Right
The French wait for the order to advance

Overview of the whole battlefiend

Next Post: Part 2, The Battle


Thursday, January 7, 2016

Battle of Waterloo in 6mm - Part 3, The Battle

Refight of the Battle of Waterloo in 6mm (Sunday 13th December).

Napoleon retained his strategic brilliance, placing his army squarely between the Prussian and Anglo-Allied armies on June 16th. His tactical genius was fading. He allowed an entire corps to countermarch aimlessly on the 16th, denying him the opportunity for a decisive victory either at Ligny or Quatre Bras. Instead, at the end of the day the beaten Prussians escaped at Ligny and Wellington still held the crossroads at Quatre Bras. On the 17th Napoleon turned his main strength towards the British, after detaching Grouchy with two corps to pursue the retreating Prussians and prevent them from uniting with Wellington. A massive storm drenched the area on the 17th as Napoleon advanced upon the Anglo-Allied army that was deploying for battle in front of Mount Saint Jean.

The 18th dawned clear, but the rain-soaked ground still made maneuvering cavalry and artillery difficult, so Napoleon delayed the start of the battle, waiting for the ground to dry. Wellington fielded an Anglo-Allied army of 50,000 infantry, 11,000 cavalry and 150 guns. In front of his line, there were three strong positions; Hougoumont, Papelotte and La Haye Sainte. Many of his veteran regiments from Spain had been sent to Canada and the United States to fight the Americans. Napoleon’s army consisted of 48,000 infantry, 14,000 cavalry and 250 guns. Many of these troops were veterans of at least one campaign.

It was about 11am before Napoleon started the battle.

Aware that the clock was ticking, and the Prussians could arrive at any time, the French quickly advanced the corps of d'Erlon on their right flank and easily drove in van Bylandt's brigade.

With the Allies on the ridge otherwise occupied, the French took a chance and sent in an attack on La Haye Sainte.

Taking a chance, the heavy dragoons of the Union Brigade attack impetuously.

D'Erlon's advance is halted by the Allies.

Both sides retire to lick their wounds. While Vivian's British light cavalry tries to sneak round the flank.

D'Erlon reorganizes while the French bring up reinforcements from both Lobau's Corps and the cavalry reserve.

The second attack on the Allied left, by the remains of d'Erlon's Corps reinforced by Lobau's Corps and part of the cavalry reserve.

Allied cavalry advance west of La Haye Sainte in the hope of distracting the French. Seeing a weakness in the French line, the Household Cavalry brigade charges and routs the French Grand Battery.

The French Grand Battery is overrun and destroyed before the supporting cavalry could intervene, but they would swiftly take their revenge on the Household cavalry.

The French heavy cavalry led by the Grenadiers a Cheval sweep forward to take their revenge on the supporting Allied cavalry.

While all this had been happening, it was all quiet on the western flank. Obviously the French player had decided that Hougoumont with Macdonnell's Guards was just too hard a nut to crack.

The French right advances again and the Allies take shelter behind the ridge.

The French heavy cavalry keep the Allies west of La Haye Sainte too busy to come to the support of their comrades.

The engagement takes place.

The French have swept the ridge clear, but hesitate behind the crest to avoid the Allied artillery fire.

The Allies are now under serious pressure, so the French don't waste any time in sending in a second assault on La Haye Sainte, this time with General Durutte with the leading brigade.

With only a few men standing, few of them unwounded, and with only a few rounds left each, the brave KGL light infantry are in trouble.

After many hours of bitter struggle, La Haye Sainte now falls into French hands and a major objective has been taken. Could the road to Brussels now be open?

The 95th Rifles had been doing sterling work from the sand pit, but their position was now untenable and they had to retire.

The French Heavy Cavalry cleared the ridge overlooking La Haye Sainte, first the supporting Allied Cavalry

and then the Brunswick artillery beside it.

The Prussians arrive only to find the Old and Middle Guard waiting to give them a warm welcome in Plancenoit.

Result
La Haye Sainte is safely in French hands, the Allied army is decimated and there is a huge hole in the middle of the Allied lines leaving Brussels open and unprotected.

The French have won a Victory!

Although it was of course "a damned nice thing — the nearest run thing you ever saw in your life".

Previous posts in this series
Battle of Waterloo in 6mm - Part 1, The Terrain
Battle of Waterloo in 6mm - Part 2, The Scenario
Wednesday, December 23, 2015

Battle of Waterloo in 6mm - Part 2, The Scenario

The map shows the setup of units for the Waterloo battlefield.

The units are colour-coded as follows:

  • Red = British
  • Orange = Dutch/Belgian/Hanoverian
  • Green = Nassau
  • Black = Brunswick
  • Blue = French

Hexes with stars show locations on which reinforcements may arrive during the game.
  • Black = Brunswick
  • Blue = French
  • Dark Blue Border = Prussian


The Setup:

All figures from Baccus. The village houses are from TBM, Hougoumont and La Haye Sainte from Irregular Miniatures, La Belle Alliance and Plancenoit church from Leven and Papelotte was scratch built. Trees by Timecast.
The battlefield from the West

The French left and Hougoumont

The French centre and La Haye Sainte

The French right and Papelotte

The battlefield from the East

The British view of Hougoumont

The British view of La Haye Sainte with La Belle Alliance and Plancenoit in the background.


Special Rules:
  • Each player gets four Leaders which can be placed anywhere on their map half.
  • 16 Victory Banners are required to win the game.
  • Hougoumont, La Haye Sainte and Papelotte are each Temporary Victory Banner objective hexes for the French player. These are Walled Farms on which (since the Austrian Expansion) a unit may ignore one flag. 
  • The river is fordable

Reinforcements:


Prussian Reinforcements:

The Allied player rolls 2 dice at the start of each allied turn. For each INF symbol rolled, the timeline for the Prussian arrival increases by 1. When it reaches 8, the Prussian reinforcements may start arriving. 

At the start of his turn, the Allied player may setup any ordered Prussian reinforcement and Blücher (who may attached or setup alone) in an empty hex marked with a dark blue bordered star. They may move and/or battle normally with the marked entry hex counting as first hex of movement.

Should a Prussian unit be eliminated from the game, it returns to being a reinforcement and may enter play as normal when ordered. However its loss still gives the French player a victory banner.

French Reinforcements:

At the start of his turn, the French player may setup any ordered French reinforcement and Lobau (who may attached or setup alone) in an empty hex marked with a blue star. They may move and/or battle normally with the marked entry hex counting as first hex of movement.

Brunswick Reinforcements:

At the start of his turn, the Allied player may setup any ordered Brunswick reinforcement in an empty hex marked with a black star. They may move and/or battle normally with the marked entry hex counting as first hex of movement.


Previous posts in this series:
Battle of Waterloo in 6mm - Part 1, The Terrain