Thursday, June 28, 2018

Battle for Malta - Scenario 5 - Sink the Italian shipping

This is the fifth scenario in a Battle for Malta campaign that follows the exploits of the Country of Dampshire 369 Squadron Auxiliary Air Force fighting against the Regia Aeronautica squadriglia d'aquila - two fictitious squadrons. We use the Wings of Glory WW2 rules, slightly modified to give faster play. We use the Wings of Glory planes where the right model is available, other manufactures are used to fill in the gaps.

We use our own set of campaign rules "Wings Over Malta". These contain 6 basic missions which will be played with alternate sides as the attacker. They will be played first with "early war" planes and then repeated with "late war planes". This differs from our previous Battle of Britain campaign which was a ladder campaign that followed more exactly the historical battle.

The Background

Malta was situated on the increasingly important sea supply route for the North African campaign. It would be a major help to the Allied war effort if the supplies from Italy to the Axis troops in North Africa could be reduced. Malta was the base for many Allied strikes against Italian shipping. The Fairey Swordfish was the Allied torpedo bomber in use at the start of the campaign.

The Fairey Swordfish was initially operated primarily as a fleet attack aircraft. It was already considered obsolescent in 1939. However the Swordfish remained in front-line service until V-E Day, having outlived multiple aircraft that had been intended to replace it in service.

The Swordfish holds the distinction of having caused the destruction of a greater tonnage of Axis shipping than any other Allied aircraft. While there were never more than a total of 27 Swordfish aircraft stationed on Malta at any one time, the type succeeded in sinking an average of 50,000 tons of enemy shipping per month across a nine-month period and during one record month, 98,000 tons of Axis shipping were reportedly lost to the island's Swordfish-equipped strike force.


The Action

Pilot Officer Emmett Hollingberry was drinking his traditional after lunch whisky with the new replacement Pilot Officer Lee N Perrin when the telephone rang. An Italian supply convoy had been spotted leaving port in Italy and heading for North Africa. The Fleet Air Arm were sending a strike of Fairy Swordfish torpedo bombers to sink the supply ships and they wanted an escort from 369 Squadron.

"What-ho!" said Hollingberry to Lee N Perrin, "now's your chance to show what you're made of!". Hollingberry grabbed the course and contact info for the Swordfish and then he and Lee N Perrin ran out to their Gloster Gladiators, jumped in and scrambled.

Knowing how important it was for the supply convoy to get through to North Africa, the Regia Marina had asked the Regia Aeronautica's squadriglia d'aquila to fly a combat air patrol over the convoy as long as possible. Capitano Vitello Tonnato flew his new Macchi C.200 fighter while Tenente Luigi Macaroni and Tenente Vittorio Gambetta flew their Fiat CR.42 biplanes.

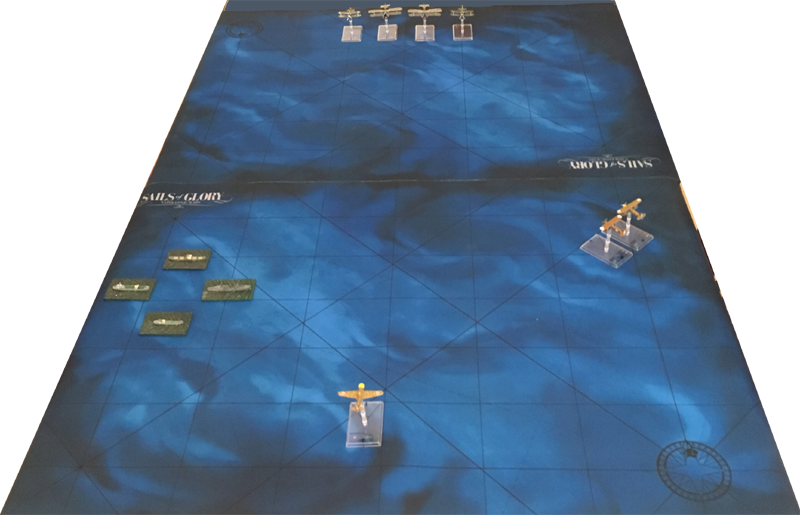
The convoy was in a diamond formation heading towards Africa.


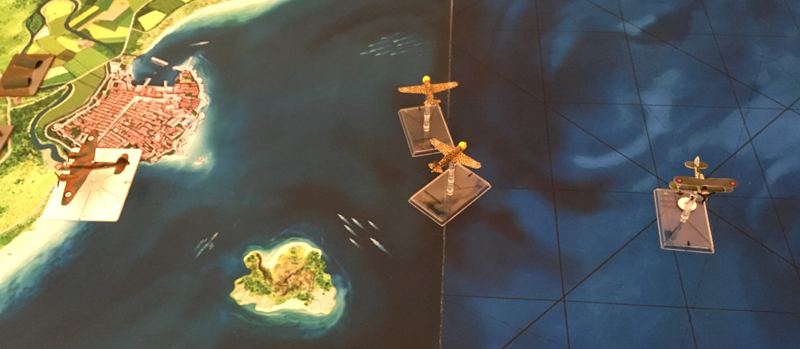
The British headed out over the Mediterranean in tight formation heading towards the expected position of the convoy.


The British spotted the convoy and its circling escort of fighters.


Both sides continued straight forward, except for Hollingberry who turned behind the Swordfish.


The planes continued to close, except for Hollingberry who dallied behind the Swordfish.


The two CR.42's opened fire on Lee N Perrin who returned fire.


The two CR.42's turned in towards the Swordfish which had themselves turned towards the Italians. Lee N Perrin's Gladiator got somehow caught in the middle. Hollingberry was still dallying behind the Swordfish.


Both CR.42's opened up on Lee N Perrin at close range.


Both CR.42's then turned sharply trying to tail the Swordfish, but instead ended up tailing Lee N Perrin's Gladiator. Even Capitano Vitello Tonnato in his Macchi C.200 fighter now closed in on the Swordfish. The dilly-dallying Hollingberry was too far behind to affect the combat.


A lucky shot from the Swordfish's rear gunner, and flames shot out from a CR.42 engine.


The two Swordfish headed towards the ships. Lee N Perrin performed an Immelmann which surprised the two Italian CR.42's. Tonnato misjudged his turn ad came in wide. The dilly-dallying Hollingberry was too far behind to affect the combat.


Lee N Perrin's Gladiator was a goner.


The rear gunners of both Swordfish opened up on the flaming CR.42 which didn't stand a chance!


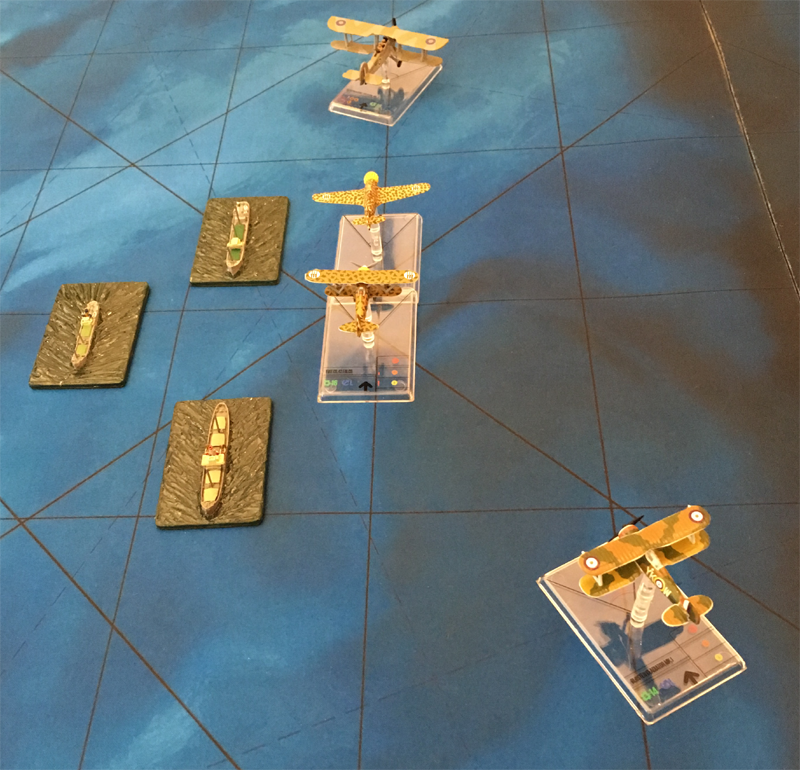
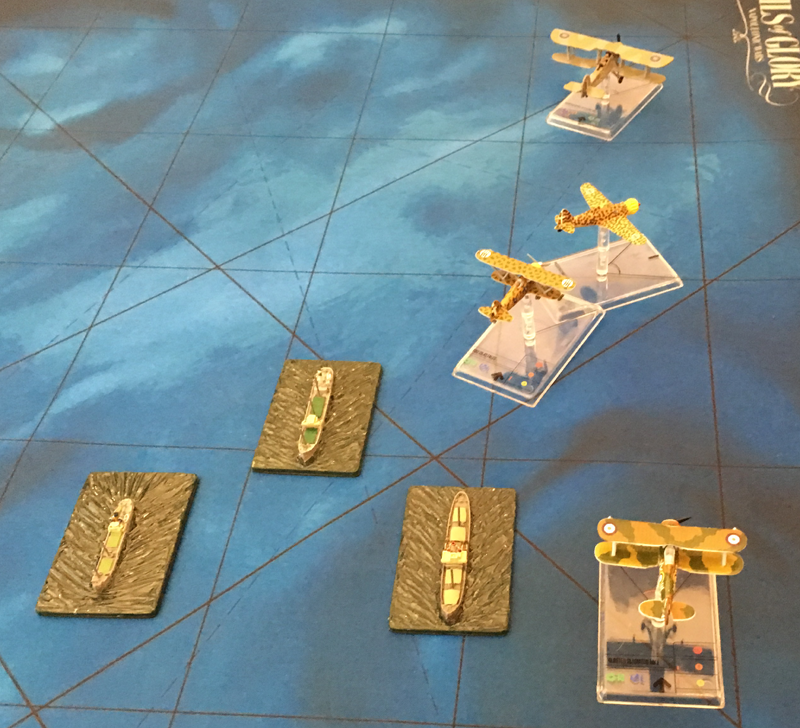
Tonnato in his M.C.200 together with the remaining CR.42 joined forced to attack one Swordfish. The other Swordfish dropped its torpedo. The dilly-dallying Hollingberry was too far behind to affect the combat.


Having dropped its torpedo, the first Swordfish turned away. The second Swordfish turned so as to line up for its torpedo run; smoke started pouring from its engine. Both Italians saw this as a good omen and opened fire again; the Swordfish's rear gunner returned fire.


The swordfish didn't make it, and crashed into the sea with its torpedo still attached.


The remaining Swordfish banked away and headed home. The rear gunner could see the torpedo hit dead centre on the convoy's lead ship. The explosion was too much and the ship broke up and sunk.


The two Italians chased the remaining Swordfish. However Hollingberry was now behind them and opened fire.


Bravely ignoring Hollingberry, the two Italians concentrated on hunting down the remaining Swordfish.


But the Italians misjudged their turns as Hollingberry closed in from behind.


The CR.42 had taken plenty of damage from the Swordfish's rear gunners and now Hollingberry could finish it of with a lucky burst.


Tonnato took a snap shot at the Swordfish and then turned for home.


While Tonnato headed for home, Hollingberry escorted the remaining Swordfish back to Malta. When the landed, the Swordfish pilot asked Hollingberry "What took you so long?".

The ships of the convoy saw the planes crash. A launch was sent to pick up Tenente Luigi Macaroni and Tenente Vittorio Gambetta. Even Pilot Officer Lee N Perrin was picked up POW. The crew of the Swordfish didn't make it.

Result

British Victory

  • Capitano Tonnato: 1 Kill, awarded Medaglia di bronzo al valore aeronautico.
  • Tenente Luigi Macaroni : 1 Kill
  • Pilot Officer Hollingberry: 1 Kill, awarded bar to DFC
  • Pilot Officer Lee N Perrin: POW
  • FAA red-nose Swordfish: 1 Kill, KIA
  • FAA black-nose Swordfish: 1 Ship Kill

Campaign Result so far...

1 Country of Dampshire 369 Squadron Auxiliary Air Force
4 Regia Aeronautica squadriglia d'aquila

Notes

ARES has no Macchi C.200 Saetta models so we used resin models Armaments in Miniature (AIM).

ARES has no Fairey Swordfish models so we used metal kits from the Skytrex Action 200 1:200 Scale WW2 range. When I added a peg to the underside of the plane to fit into a Wings of Glory stand, there was no room to add the torpedo which came with the kit; luckily I could use these spare torpedoes as dropped torpedo markers.

The ships are 1:1200 Hallmark models sold by Magister Militum.

Friday, June 22, 2018

Battle for Malta - Scenario 4 - Attack on Luqa airfield

This is the fourth scenario in a Battle for Malta campaign that follows the exploits of the Country of Dampshire 369 Squadron Auxiliary Air Force fighting against the Regia Aeronautica squadriglia d'aquila - two fictitious squadrons. We use the Wings of Glory WW2 rules, slightly modified to give faster play. We use the Wings of Glory planes where the right model is available, other manufactures are used to fill in the gaps.

We use our own set of campaign rules "Wings Over Malta". These contain 6 basic missions which will be played with alternate sides as the attacker. They will be played first with "early war" planes and then repeated with "late war planes". This differs from our previous Battle of Britain campaign which was a ladder campaign that followed more exactly the historical battle.

The Background

The port and airfields of Malta were the main targets for the Regia Aeronautica.


The Action

Having successfully defended their airfield from a British attack, Capitano Vitello Tonnato decided that he wanted to give the RAF some of its own medicine. Unfortunately the Regia Aeronautica had no bombers available that day, so Tonnato decided that he and Tenente Vespa Piaggio would make do with a low-level strafing attack instead. They consulted the map of Malta, and picked Luqa airfield as their target.

Capitano Vitello Tonnato decided that they would fly the brand new Macchi C.200 fighters. The took of and headed over the Mediterranean towards Malta.

Flying Officer Cholmondeley Featherstonehaugh and Pilot Officer Emmett Hollingberry were in the ready-room of Luqa airfield drinking tea and eating digestives when a telephone call came through that RADAR had spotted and incoming raid heading straight towards Luqa.


Flying Officer Cholmondeley Featherstonehaugh and Pilot Officer Emmett Hollingberry scrambled; they ran and jumped into their waiting Gloster Gladiators and took off.


Both side headed straight towards each other. Tonnato climbed his Macchi to avoid the risk of collision with his wingman.


Both sides continued straight forward, each waiting for the other to make the first mistake.


Yet again, both sides continued straight forward. Tonnato and Piaggio started to think about sneaking past the Gladiators without needing to fight.


Led by the fearless Featherstonehaugh, the Gladiators turned towards the Macchi. Tonnato turned towards the Gladiators to distract them while Piaggio headed for the airfield hangers.


Tenente Vespa Piaggio strafes the airfield while his leader keeps the two Gladiators busy.


Featherstonehaugh and Hollingberry chased Piaggio as he strafed the airfield. Tonnato performed an Immelmann in the hope of getting on the tail of a Gladiator.


Featherstonehaugh turned back to face Tonnato. Piaggio completed his run across the airfield. Hollingberry misjudged his turn and overshot his target, Piaggio.


Tonnato pulled a sharp right turn and got a close range burst into Featherstonehaugh. Piaggio performed an Immelmann in order to make a second pass over the not burning airfield as Hollingberry turned in to attack him.


Hollingberry overshoots again with his left turn, while Piaggio destroys the airfield. Featherstonehaugh and Tonnato continue their dogfight.


As Piaggio finishes his second strafing run across the airfield, Tonnato turns in to try his hand at shooting up the hangers. Featherstonehaugh and Hollingberry are too far away to make a difference.


Featherstonehaugh in his Gladiator goes head-to-head with Piaggio in his Macchi. Tonnato continues to shoot up the hangers. Hollingberry performs an Immelmann intending to rejoin the fray.


Both the Italians gang-up on Featherstonehaugh leaving his plane looking like a colander. Hollingberry is trying to rejoin the fight.


Featherstonehaugh's Gladiator was barely flyable, so he headed out of the fight looking for a safe airfield to land at. Piaggio turned and fired a long close range burst into Hollingbarry.


Featherstonehaugh left the fight as fast as his crippled Gladiator would take him. Hollingberry and Piaggio exchanged snap shots as they almost collided.


Both Macchi C.200's now decided their work was done. They had taken some damage but the planes were still flyable and they had left behind an airfield in flames. Hollingberry was left circling over the smoking Luqa, looking for a place to land.


All airplanes returned safely to their bases. Although Featherstonehaugh's Gladiator would take many weeks to repair.

Result

Italian Victory

Campaign Result so far...

0 Country of Dampshire 369 Squadron Auxiliary Air Force
4 Regia Aeronautica squadriglia d'aquila

Notes

ARES has no Macchi C.200 Saetta models so we used the ones from Armaments in Miniature (AIM).

The airfield target cards are 1/1000th scale models from the RAF Fighter Base made by Brigade Models.

Sunday, June 17, 2018

Club Game - The Siege of Stegeborg Castle

Had great fun at the club yesterday playing Oxenstierna, one of the rebels at the Siege of Stegeborg Castle, Sweden, in the year 1318. We, the brave and righteous rebels, were attacking the Swedish King Birger Magnusson in the castle when his son Prince Magnus attacked us in the rear with his Danish reinforcements.


I played Oxenstierna and his men at arms as well as the trebuchet (scratch-built by Dalauppror). Oxenstierna attacked the Danes and protected the trebuchet which kept up a murderous fire on the castle's defenders.


When it looked like the Danes were advancing in too large numbers, Oxenstierna challenged and killed Prince Magnus which demoralized the Dames.


The battle resulted in a great victory for the brave and righteous rebels.

The whole battle can be found on Dalauppror's blog,

Friday, June 15, 2018

Battle for Malta - Scenario 3 - Attack a Regia Aeronautica airfield

This is the third scenario in a Battle for Malta campaign that follows the exploits of the Country of Dampshire 369 Squadron Auxiliary Air Force fighting against the Regia Aeronautica squadriglia d'aquila - two fictitious squadrons. We use the Wings of Glory WW2 rules, slightly modified to give faster play. We use the Wings of Glory planes where the right model is available, other manufactures are used to fill in the gaps.

We use our own set of campaign rules "Wings Over Malta". These contain 6 basic missions which will be played with alternate sides as the attacker. They will be played first with "early war" planes and then repeated with "late war planes". This differs from our previous Battle of Britain campaign which was a ladder campaign that followed more exactly the historical battle.

The Background

The RAF sent bombers such as the Bristol Blenheim Mk.I to attack the Italian airfields and disrupt their attack on Malta and on shipping.


The Action

No.369 Squadron was tasked with sending a raid to attack an Italian airfield in order to give the Regia Aeronautica no rest. The squadron was short of both aircrew and aircraft, so the raid only consisted of a single Bistol Benheim Mk.I bomber escorted by a Gloster Gladiator. Pilot Officer Bruce Wayne took the Gladiator and Pilot Officer Brett Sinclair flew the Blenheim.

The raid was spotted by a Regia Marina MAS boat which radioed in the sighting. Thus the Italians had time to send up two of their new Macchi C.200 Saetta (Lightning) fighters to intercept. The Saetta monoplane was more robust than the older CR.42 Falco and Gloster Gladiator biplanes but much less maneuverable. Capitano Vitello Tonnato and Tenente Vittorio Gambetta jumped into the brand new monoplanes and raced out to sea to intercept.


The Italians headed towards the British planes in a tight formation, still trying to learn the maneuverability of their new monoplanes. The Gladiator slowed down, letting the Blenheim take the lead.


The Gladiator climbed to gain height as the Italians closed on the Blenheim.


The Macchi C.200's open fire on the bomber. Capitano Vitello Tonnato makes a lucky shot and wounds the bomb-aimer in the nose of the Blenheim.


The Macchi C.200's manage a last quick burst as they pull back on their sticks and fly over the top of the bomber. The Blenheim's dorsal turret manages a quick burst in return as they fly overhead.

With his second burst, Capitano Vitello Tonnato fires into the nose of the Blenheim and yet again hits the bomb-aimer who is then killed.


The Italians performed an Immelmann turn as the British continued straight on, the bomber diving to escape the fighters.


The Blenheim sped on, chased by, but just out of range of the Italian fighters. It was now the Gladiator's turn to perform an Immelmann.


Realising that they had no hope of catching the Blenheim, the Macchi C.200 fighters turned to attack the Gladiator.


The figthers started dogfighting. The Blenheim had now realized that with the bomb-aimer done for, they had no hope of completing the mission and it was time to get out of here.


The Blenheim turned for home. The Gladiator performed and Immelmann in the hope of catching one of the Italians.


As the dogfight between the fighter continued, the Blenheim dived to get away from the Italians.


The fighters decided that they shouldn't let the Blenheim get away, so they started chasing again. The Gladiator performed an Immelmann to follow the Macchi C.200's.


The bomber pilot decided he didn't want to be a sitting duck, so he turned into the Italian fighters.


The bomber's sharp turn not only confused the Italians, but also gave his dorsal gunner a good shot.


The Blenheim turned once more for home as his escorting Gladiator charged into the fray to help.


The combatants now paired off, the Gladiator againt one Macchi C.200 and the other Macchi C.200 against the Blenheim.


Both Macchi C.200's now ganged up against the Blenheim.


The Gladiator turned in to chase off the Macchi C.200's and protect the Blenheim.


But the Gladiator overshot, and soon the Macchi C.200's were on the Blenheim again.


Before the Gladiator could return, both Macchi C.200's were on fring short range bursts at the Blenheim.


The Blenheim could take no more!


The Blenheim flown by Pilot Officer Brett Sinclair crashed in the sea. Sinclair and his air gunner jumped into their dinghy taking with them the body of the dead bomb-aimer. They were soon picked up by the same Regia Marina MAS boat that had spotted the incoming raid. They were given a bottle of grappa to share during the journey back to port.

Capitano Vitello Tonnato and Tenente Vittorio Gambetta returned to base to celebrate their shared kill and the fact that they had protected the airfield from the British attack. And to top it all off, Tonnato was now an ace, which they celebrated by each drinking a whole bottle of Disaronno Almond Liqueur!

Pilot Officer Bruce Wayne couldn't catch the Macchi C.200's which weren't interested in fighting him, so he returned to base with his tail between his legs.

Result

Italian Victory

  • Capitano Vitello Tonnato: ½ Kill
  • Tenente Vittorio Gambetta: ½ Kill
  • Pilot Officer Brett Sinclair: POW

Campaign Result so far...

0 Country of Dampshire 369 Squadron Auxiliary Air Force
3 Regia Aeronautica squadriglia d'aquila

Notes

ARES has no Bristol Blenheim or Macchi C.200 Saetta models so we used the Blenheim Mk.II from the Skytrex Action 200 range and the Macchi C.200 Saetta (Lightning) fighters from Armaments in Miniature (AIM).

The airfield target cards are 1/1000th scale models from the RAF Fighter Base made by Brigade Models.