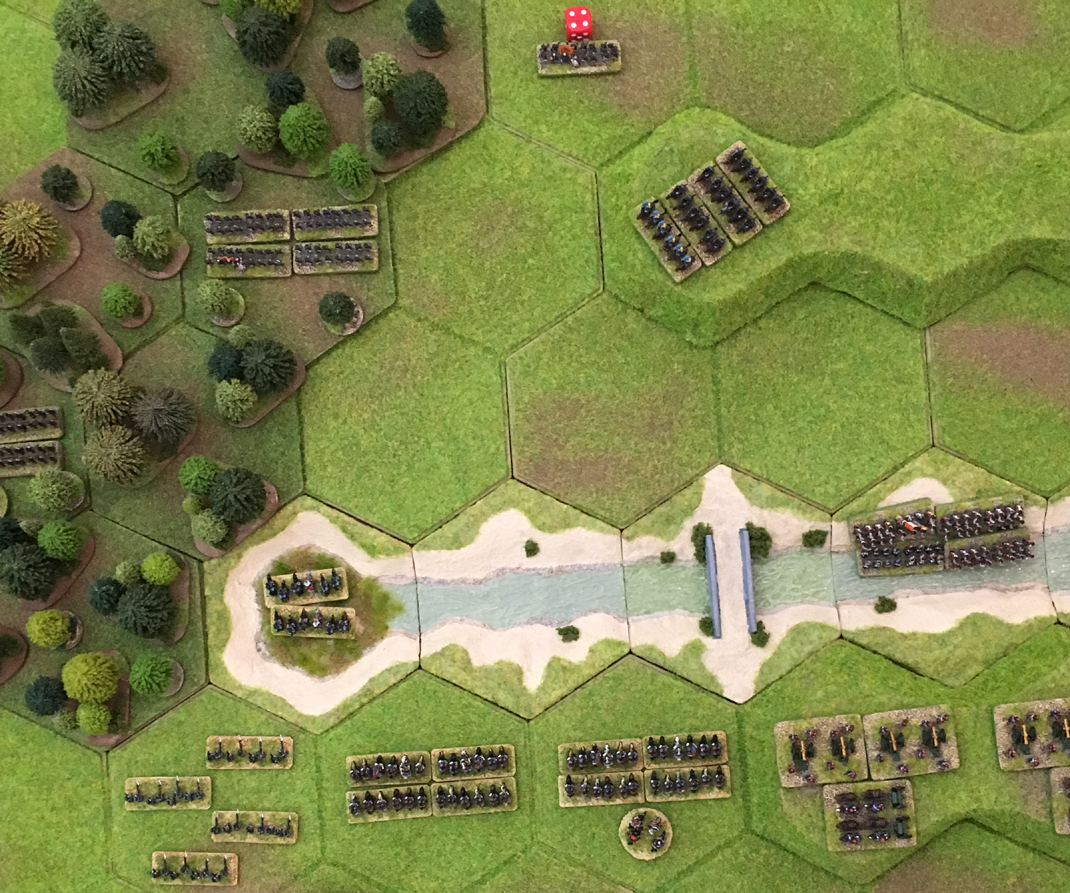
This scenario is a refight of the Battle of Quatre Bras (16 June 1815) during the Hundred Days. It was played using the Commands & Colors Napolionic rules but on hex terrain from Kallistra, buildings from Total Battle Miniatures, trees mostly from Timecast and using 6mm figures from Baccus instead of blocks.
The History
Napoleon Bonaparte’s surprise march placed his army squarely between Blucher’s Prussians at Ligny and Wellington’s Anglo-Allied army assembling around Brussels. Napoleon concentrated most of his strength against Blucher, but ordered Ney and the II Corps to capture the vital crossroads of Quatre Bras to deny Wellington the chance to reinforce Blucher. Ney procrastinated and his attack did not get underway until two in the afternoon. The delay allowed Wellington to bring fresh allied troops to support the Dutch-Belgians and the Nassau Brigade that were thinly deployed south of the crossroads.

The initial French advance was greeted with musket volleys, but the outnumbered Allied troops were forced back. The Allied units in the wood, however, managed to hold. Facing three infantry divisions and a cavalry brigade, the Allied situation was fast becoming desperate, but additional troops kept arriving and Wellington, now in command, directed them to key positions on the battlefield.
Ney realized that the numerical balance was shifting in favour of the Anglo-Allies and that he could only capture and hold Quatre Bras by a desperate move. He ordered General Kellermann to lead his cuirassier brigades forward and break through Wellington’s line. The cuirassiers managed to reach the crossroads, but were driven back by close range artillery and musket fire. The arrival of the British Guards Division late in the day gave Wellington sufficient strength to launch a counter-attack that forced the French to give up all of their hard fought territorial gains.

This scenario (available here) is an alternative to the original Quatre Bras 014 scenario. It was inspired by William Barnes Wollen's painting of the battle "Black Watch at Bay" which shows the Black Watch Highlanders surrounded by French lancers. However the original scenario had neither the Black Watch nor any lancers. This scenario adds a unit of French lancers and upgrades one of Picton's British Line Infantry units to "Grenadier" to represent the Highlanders. Kellermann's Cuirassiers and Cooke's Foot Guards are no longer available at the start of the battle, they arrive on the marked hexes when a unit crosses the stream.

The Refight
Instead of advancing, the French held their positions and opened fire on the Allies. This caused artillery casualties on their left (in the Bossu Wood) and infantry casualties on their right (on the hill). However the artillery fire in the centre had no noticeable effect.

The Allies send out a coordinated set of orders, the infantry in the centre under the command of the Prince of Orange was to withdraw behind the hill out of the French artillery's field of fire.
At the same time, the artillery on both Allied flanks, opened up with a intense but ineffective fire.

Seeing the Dutch-Belgian infantry retreating from the ridgeline, Marshal Ney ordered two units of line infantry to probe forwards and start crossing the stream.

Seeing the French start probing the centre, General Perponcher on the Allied right, decided to start skirmishing with his Nassau light infantry in the hope of distracting the French commander, Fire from the Nassauers caused casualties in the opposing French light infantry.

Ignoring the annoying Nassau skirmishers on his left, Marshal Ney ordered the infantry columns in the centre to perform a bayonet charge and take the opposing ridge.

The two French columns on the left of the ridge, wiped out the defending Brunswick infantry with only slight losses to themselves and advanced up onto the ridge.
The two French columns on the right of the ridge, attacked the two Dutch-Belgian infantry units under the command of the Prince of Orange. The first Dutch-Belgian infantry lost most of its effective strength and retreated through the village of Quatre Bras and reformed in safety behind it. The second Dutch-Belgian infantry, with the Prince of Orange at its head was wiped out. The Prince had a lucky escape and fled to the Dutch Hussars who were waiting in reserve.

At this time Marshal Ney was pleased to be informed that the Cuirassiers of General Kellermann could be seen entering the battlefield. However he could even see a dust cloud on the road leading north from Quatre Bras, a sign the Cooke's British Guards would soon be in action.
Seeing the French had captured the ridge, the British Guards followed by their artillery battery, attacked immediately. Their withering fire caused a French column to retreat back off the ridge having taken 50% casualties.

Marshal Ney sent a scout to General Kellermann, ordering him to bring up half of his Cuirassiers to counter the treat posed by the British Guards.

In order to give the Guards time to advance and deploy for the fight, the Prince of Orange ordered a cavalry charge. With himself at the head of the Dutch hussars, and accompanied by the Brunswick Hussars they charged at the French columns on the hill.

The French infantry formed squares as they saw the advancing cavalry. The Brunswick hussars charge failed and they retired into Quatre Bras. The Dutch hussars, with the Prince of Orange at their head caused light casualties on the French square which held firm.
Marshel Ney ordered Kellermann and his Cuirassiers forward in support of the square and restrict the Allied cavalry while ordering the infantry unit which had be shot up by the British Guards to retire.
On their left flank, the French infantry had started to occupy the Bossu wood. On their right flank, the infantry had advanced to the stream under the covering fire of their artillery battery which wiped out the Dutch-Belgian infantry that was on the front slope of the hill opposite.

The British ordered forward Picton's division to support their allies and Cooke's Guards to continue their attack on the ridge. The Guards firepower decimated the French square on the hill. At the same time, the Brunswick infantry in the Bossu wood opened fire on the French infantry that were already retiring away from the Guards.

The situation on the ridge was looking dire for the French, so Marshal Ney ordered a cavalry charge. Kellermann with his Cuirassiers was to charge over the hill and drive off the Dutch hussars who were still threatening the French infantry in square. The other French cavalry was to advance so as to be in support later.

Advancing at a trot over the hill, the armoured Cuirassiers crashed into the flank of the Dutch Hussars and annihilated them. The Prince of Orange was forced to flee to the safety of The Brunswick Hussars in Quatre Bras.

Without slowing at all, Kellermann and his Cuirassiers continued their attack and fell upon Picton's unsuspecting artillery, even they were wiped out.

The Alies held their position and opened fire which eliminated the French squares on the ridge,
The French centre renewed the assault.
On the left the Cuirassiers attacked the Dutch-Belgian artillery on the hill. The artillery was destroyed and the Cuirassiers advanced down the rear slope but stopped before attacking Picton and his British Line Infantry.

On the left the French Hussars and Lancers attacked the British Guard infantry. The Guards were confident and didn't form square. They were hit first by the lancers and then by the hussars. This combined attack was so successful, that it destroyed the Guards with loss.

Through a gap between the Bossu wood and the other Guard unit, the Hussars saw an artillery battery. Leaving the lancers behind to mop up the infantry, the Hussars charged. The artillery took minor casualties but the Hussars took heavy casualties from short range canister shot and were forced to retreat.

At the head of the Brunswick Hussars, the Prince of Orange attacked the retreating French Hussars and eliminated them.

Marshal Ney ordered a final assault in the centre. The Cuirassiers attacked the Brunswick Hussars, The Lancers occupied the Quatre Bras crossroads. Two units of line infantry retook the ridge.

The lancers decided that it was best to secure the Quatre Bras village and crossroads, and thus making reinforcing Blucher difficult for Wellington, rather then attacking the understrength Dutch-Belgian infantry who could be troublesome if they formed square.

Both the French infantry units open fire on the British Guards, and both caused casualties.

The Cuirassiers had artillery support when they charged into the Prince of Orange and his Brunswick Hussars. The hussars were wiped out. Having had a third unit wiped out with him at their head, the Prince of Orange was captured by the Cuirassiers.

The Cuirassiers continued their advance, but were brought to a halt when the British Guards formed square. The cuirassiers couldn't break the square, and the Guards' musket balls just bounced of the Cuirassiers' armour.

As darkness fell, Wellington withdrew his troops northwards, towards Genappe and then the field of Waterloo.
The Prince of Orange had survived, despite having had one brigade of infantry and two of cavalry wiped out with him at their head. That evening, Marshal Ney celebrated his victory and the capture of the Prince of Orange by inviting him to dine at the Gémioncourt farm just south of Quatre Bras.
That same evening, the Duke of Wellington celebrated the capture of the Prince of Orange, knowing that Colonel Ompteda and his KGL Line Infantry would not be annihilated in two days' time at La Haye Sainte farm.
The Outcome
French Victory: French 9 - Anglo-Allies 4