Sunday, November 18, 2018

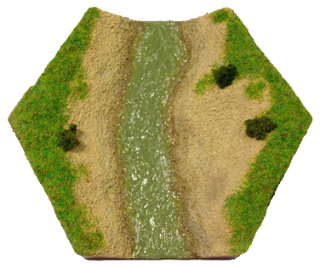
Making Rivers for Kallistra Hex Terrain

I have been using Kallistra hex terrain for a while now and am very pleased with the results, especially for Commands & Colors games.

One thing that I have always thought is wrong with most wargames terrain, mine included, was that rivers and lakes were placed on top of the terrain. In the real world rivers and lakes are sunk down into the terrain. I believe that a much better visual appearance is achieved if such watercourses are sunk below the surface of the playing area. A friend of mine came up with a great way to solve this problem when using Kallistra hex terrain and I copied him. This works for rivers, shorelines and other such waterways.

Now I needed half-a-dozen more straight sections, so I decided to post a how-to here on my blog.


Here's one recipe for how to do it 

To get the river at a lower level than the surrounding ground, just use the normal Kallistra hexes but turn them upside down. This gives you a deep hole to use. To get the river to blend in with the surrounding terrain, I gave the areas nearest the edges a base coat of Dulux Salisbury Stone and flocked them with Spring Meadow as described in Kallistra's How To Guides.

List of Ingredients

  • Kallistra's single brown hexes: HEXIIS/BR Single Hex Pack - BROWN - 10 pieces plus clips 
  • N50210 Noch Flock - Spring Meadow - 100g Bag 
  • Dulux vinyl matt emulsion, colour:30YY23246, Salisbury Stone (However as this isn't available in Sweden so I used the Alcro equivalent instead: NCS S 5020-Y10R). 
  • Modelling Clay. I used Panduro's Terrakotta Hobby Clay 
  • White PVA Wood Glue. Best used when new and fresh because it loses its adhesive qualities over time, especially if it has been stored in a cold place such as a garage or shed over a winter period. 
  • Fine sand - available from any good pet shop. 
  • Green stuff. (Optional) 
  • Paint. See below. 
  • Matt Varnish. I used Panduro Oceanlack 
  • Liquitex Gloss Heavy Gel 
  • Noch 95360 Clump Foliage. (Optional) 

If you are doing a large number of hexes, using Citadel or Humbrol paints will be very expensive. I went to my local hobby/craft shop (Panduro) and purchased hobby paints much cheaper there. The ones I got had a satin finish but this doesn't matter as I intend to give them a coat of Matt Varnish. You will need the following colours:

  • Beige (Sand) 
  • White 
  • Leaf-green 
  • Grey 
  • Coffee Brown 

The Method

Step 1. Wash the Hexes.

Wash the Hexon II boards in warm soapy water to remove any release agents that may be present from the manufacturing process.

Step 2. Mark Out the River.

Turn the hexes upside down and mark out the course of the river. The hexes are structured in such a way that there is an "obvious" width and entry point in the middle of each hex side.

Step 3. Cut Out the River Entry Points.

With a saw or a sharp knife cut out the river entry points. Make sure that these are the same on all hex sides so that they match up when placed together.


Step 4. Modelling clay.

Fill the hexes with modelling clay from the river bank up to the edge of the hexes.


Step 5. Allow To Dry.

Allow to dry thoroughly. The clay may shrink slightly and/or crack when dry.


Step 6. Glue the River Banks in place.

Glue the river banks in place using white wood glue. It doesn't matter if some small cracks show as these will be covered in the next step.


Step 7. Optional - Add any terrain pieces.

Now add any additional terrain pieces. A bridge can be fixed in place (here a Stone Bridge from Irregular Miniature's 6mm Scenic Range). The bridge was raised so that it was near "ground level" and the middle pier was extended down to river level using plastic card and green stuff.


Step 8. Cover the River Banks with Sand.

Cover the river banks with white wood glue and then sprinkle them with a coating of fine sand. This should hide any cracks that appeared when the clay dried.


Step 9. Optional - Fill in any gaps at the hex edges.

I was a bit sloppy with the modelling clay and the sand - I could have been a bit more careful. There were small gaps at the edges of the river hexes which showed up when they were placed against a normal terrain hex. I filled these gaps using green stuff.


Step 10. Paint sand/beige colour.

Cover the whole river hex in a sand/beige base paint.


Step 11. Paint the River.

Mix a watery brownish colour using a mixture of two parts beige to one part coffee brown and a splash of water. Paint the edge of the river where the bank meets the hex base with a thin line of this mixture.

Allow to dry and then dry-brush over with beige to blend it in with the bank.

Mix equal quantities of leaf-green, medium grey and white and paint the river.


Step 12. Paint under the grass.

Paint the areas nearest the edges of the hex a base coat of Dulux Salisbury Stone in order that they will blend in with the surrounding terrain when flocked.


Step 13. Varnish.

Cover the whole hex in a coat of Matt Varnish.


Step 14. Water.

Create a water effect using Liquitex Gloss Heavy Gel. Apply quite thickly and work with a Games Workshop Sculpting Tool to give a running water effect. Allow to dry thoroughly before moving on to the next step, otherwise there is a risk that the flock with stick to the Gel.


Step 15. Flock.

Cover the areas nearest the edges of the hex in white wood glue and then sprinkle with Noch Spring Meadow flock.

Step 16. Optional - Add foliage.

Add some small clumps of Noch 95360 Clump Foliage to give the impression of bushes.


Job Done!

Six new straight sections...


Another picture of the river in use...


You can even use the same technique for coastal hexes instead of rivers. In this case you cut away not just the entry points but the whole of one side. You can choose a more Mediterranean blue instead of a river green colour.


Sunday, November 4, 2018

Foraging Party (54 BC)

This is the third scenario that we have played with the Romans vs the Ancient British. We will use our simple campaign rules to link these scenarios. It was planned to use the three scenarios in Expansion 2 but it is beginning to look like we will add a fourth. We are "cheating" by combining both of Caesar's campaign in Britain in order to do so.

Previously we have been playing Commands & Colors Ancients with Baccus 6mm models. However we didn't have enough Ancient British models so we played these scenarios with paper cut-out flats by Peter Dennis and Helion Publishing. Hex terrain from Kallistra.

Historical Background

When Julius Caesar resumed his march inland, the Britons united under their newly appointed leader, Cassivellaunus. He ordered his troops to avoid pitched battles with the legions. Instead, they were to just harry the flanks of the legions and to wear down the Roman cavalry by drawing them into skirmishes, only to retire after a brief fight. Caesar was impressed with the mobility and open order fighting capability of the tribesman. He countered by increasing the size of his foraging parties and emphasising the need for the legionnaires to support the cavalry. The next Roman foraging party was almost 20,000 strong, with three legions and all the cavalry. Caesar assigned the legate Gaius Trebonius to lead this detachment. Aware of the large amount of Roman infantry in the column, Cassivellaunus still broke his own rules and attacked – confident that his forces could strike and retire before the legions could close to battle. Trebonius ordered a counter attack and the Roman cavalry, closely supported by the legions, broke out of the attempted encirclement, The Roman cavalry then charged home and routed the Britons. The defeat broke the British alliance of tribes and gave Caesar temporary control of this part of the island.

The Setup

The British Right seen from the Roman lines.


The British Left seen from the Roman lines.


The Roman foraging party advances towards the awaiting British


The Action

As the Romans advanced, the British threw some light chariots and cavalry against the Roman right flank.


The British were repulsed with losses, but not without first causing serious casualties to the Roman auxilia infantry.


The Romans pushed forward the infantry in their centre.


The Romans then through a single cavalry unit at the British right flank.


This attack pushed back one British light chariot unit.


The British the counterattacked the Romans with a unit of light chariots.


The Romans now attacked with their legionary infantry in the centre.


A nasty hole appeared in the British centre.


The British counterattacked in desperation.


The British had the Gods on their side, the counterattack was successful.


Deciding he was in a precarious position, the Roman general withdrew his lone legionary unit and advanced his other troops in support.


Seeing the Romans retire, the British threw everything they could at the Romans.


But the retiring Romans were still made of tough stuff; the British charge recoiled and the Romans went on the counterattack.


British light chariots and cavalry charged a lone under-strength unit of auxilia infantry on the Roman right flank.


The auxilia decided that discretion was the better part of valour and retired. The Roman general then ignored the British troops on his right flank and instead attacked in the centre.


The Romans wiped out the last of the British warband and the rest of their army lost heart and fled the field of battle.


Result

Roman marginal victory. Prior to the final attack, both sides had equal losses. The final Roman attack tipped the scales in their favour!

What's Next?

We have now played the three scenarios for Caesar's invasions och Britain in our mini-campaign. The Romans won all three battles which is fairly historical. However they lost an Eagle in doing so. We will now try and create a new fourth and final scenario in which the Romans must rescue "The Lost Eagle".

Saturday, November 3, 2018

A Fantasy Adventure – Act 3.

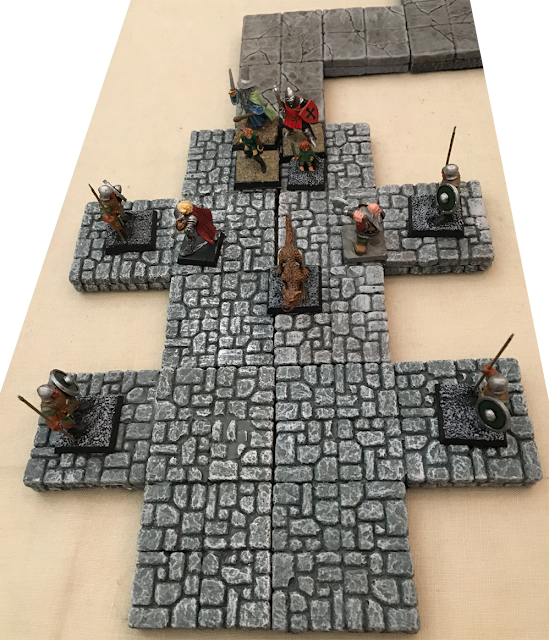
This is a dungeon crawl using tiles from DMB Games and the Swords and Wizardry “Old School D&D” rules.

The party consists of 6 third-level adventurers: a dwarf fighter, a human paladin, a human female ranger, a half-elf magic-user, a human cleric and a hobbit thief as well as Fido the dog.


Having safely returned the farmer's daughter to her family, the party were feasted; a whole pig was roasted and plenty of the best scrumpy was served.

Many of the farmer's neighbours came from far afield. When they heard about the rescue, some farmers told the party that their young sons had disappeared. At first it was thought that they had gone off adventuring but not the farmers were beginning to suspect that they had been kidnapped. The farmers asked for the party's help to return their sons and the party agreed.

A few days later, once their hangovers had worn off, the party set off. They were led by the ranger who soon located goblin and rat tracks in the vicinity of where the boys had disappeared. The tracks were followed and they came to a ruined deserted way station. In the corner of the way station was a staircase going into a cellar.

Led by the ranger and the hobbit, the party descended. The entrance hallway had a high ceiling held up by four pillars. In three side of the room their were doors, the fourth side had bowl in which a fire burnt mysteriously without any visible source of fuel.


The party decided to try the door nearest to the staircase. The hobbit listened and then picked the lock. The room was filled with cobwebs and like the previous room had a high ceiling. In a corner there was the body of a dead goblin. The party rushed in, led by the dwarf and Fido the dog.


Two giant spiders were lurking in the webs by the ceiling and jumped down surprising the in-rushing party. The spiders were defeated surprising quickly. the room was then searched and a mixture of coins from the spiders' victims worth 15 gp were found. No other exits were found in the room, so the party returned to the entrance hallway.


The second door from the entrance hallway led down a corridor which then turned left and opened into a long room with four alcoves, two on each side. In each alcove stood a statue of a soldier. The party sent in Fido first and then followed behind without waiting to see what happened. When Fido reached the middle of the room, the statues came to life and attacked the party. It was a hard fight, the statues stone-hard armour made them hard to defeat.

Having defeated the four statues, the party was shocked to see them all stand up again. Luckily for the party, they returned back to their alcoves. The party searched the room for treasure, but none was found. However the dwarf and the half-elf magic-user found a secret door behind one of the statues.


The party squeezed through the small secret door and entered another room. The room was filled with noisome trash and debris piled into the corners. Ten giant rats had made their lair in this room.They attacked as soon as the party entered, in order to protect their lair.

The party defended themselves; the dwarf and the hobbit doing the most of the killing. Having removed the threat from the rats, the party searched the room very quickly before moving on through the door in the right hand wall.


The party entered a small room. This room had the appearance of a storage room that was hit by a tornado. Crates and barrels were smashed, clawed and scattered throughout the room. The smell of rotted food and rat dung is overpowering. The room contained nothing of interest except a door in the left hand wall.

They opened the door and were met by a wererat and four rats. The wererat had heard the noise of the party fighting its way towards him so he was expecting them and not at all surprised.

It took a while before the cleric remembered that lycanthropes cannot be harmed by normal weapons. They soon noticed that the wererat was concentrating his attacks on the paladin who was attacking with a magic sword. Now aware of the challenge, the ranger opened fire with two magic arrows. The dwarf finished off the rats while the paladin and ranger did for the wererat together.

The room was searched and bags of copper, silver and gold coins worth 150 gp were found hidden among the debris.


There being no other exits from this room, the party retraced its steps to where the corridor branched. They followed this second corridor and met a party of 8 wandering goblins.


Five goblins were quickly dispatched, the remaining three fled along the corridor and into a room that was full of mushrooms.This room had a deep, earthy smell with a muddy, dirt floor. Moisture dripped from the severely cracked ceiling. The nature of the room has allowed a wild variety of strange mushrooms to grow. The goblins hid among the mushrooms, trying not to be seen.

The party opened the door, looked in and decided that it was not worth the effort to follow the goblins.


The party returned to the entrance hallway and the final doorway.


They entered through the door, with the dwarf and the paladin leading as usual.


Through the doorway their was a corridor leading straight ahead. The corridor widened into a hallway and there stood eight skeletons on guard. As the party advanced a portcullis fell, separating the leading two adventures from the rest of the party.

The dwarf and the paladin advanced to attack the skeletons and the hobbit tried to find a lock to pick or an opening mechanism on the portcullis but without success. While the dwarf and the paladin were in combat, the cleric pulled out his holy symbol, held it above his head and shouted loud and clear "Flee Before the Power of Law, Foul Undead Things of Chaos!". However the cleric was behind the portcullis and too far away, the skeletons were not affected.

When the dwarf and the paladin had chopped up the skeletons they returned to the portcullis. As no way had been found to open it, they tried brute strength. Together with the ranger and the cleric on the other side, the managed to lift the portcullis up into the ceiling again and the whole party could continue.

Fido the dog picked up a nice femur on his way past!


The party advanced until they reached another door. This they kicked in and the dwarf and the paladin rushed in. As they entered a pit trap with spikes opened under them, The dexterous dwarf continued without problem but the less dexterous paladin fell back into the pit taking damage from the fall.


Waiting for them in the room was a evil priestess, her four charmed goblin servants and four skeleton guards.


Being afraid to fall into the pit, the party sent in Fido the dog to support the dwarf. On his four legs he had no trouble making it safely past the pit. Fido was especially effective against the skeletons, he just loved playing with their bones.

The fight was a hard one, the goblins and the evil cleric doing grave injuries to the dwarf. The fight was so distracting that the party members forgot to help the paladin out of the pit. Seeing that he dwarf was seriously wounded, the cleric rushed in to heal him. Unfortunately in his haste, the cleric forgot about the pit and slipped in. The cleric was pulled out and he could heal the dwarf who was fast approaching death's door.

The skeletons were destroyed, one goblin was dead and the other three near death. Running out of spells, the evil cleric decided to use her last spell to fill the room with darkness. In the darkness she escaped through a secret door behind some tapestries hanging on the far wall.

"I will create light to dispel this darkness" cried the magic-user. However he slipped on his way into the room and landed in the pit. He was pulled out of the pit and could then cast a light spell which would dispel the evil darkness.

From their corner, the party examined the room. The far side of the room had a compass rose on the floor. Several rich tapestries hung on the walls, depicting foul sacrifices and evil acts of the Frog God. The room had furnishings for the cleric to live and worship here. There were beds and chests along the west wall, a “throne” on the north wall and an altar to the Frog God on the south wall.

The cleric had vanished and the three remaining goblins could be seen attempting to hide under a bed in the opposite corner of the room.


The party decided that the compass roe on the floor was too dangerous to tread on when they were so weakened. It was decided that they would return to the surface to recuperate and return the next day to continue.

When they returned, the goblins had gone and the room had been stripped bare. The dwarf and the half-elf magic-user suspected that the evil cleric had used a secret door to escape. They searched carefully until the door was found.

Behind the door they found a passageway leading to a cell where the two young farmer's sons were found.

There was also a room containing a pool with a fountain in the middle. The party decided not to drink from the pool or investigate it further.


The party gave the half-starved boys some food and then returned to the surface. They were rather miffed that the contents of the evil clerics room were no longer there; they would never know what was in those treasure chests! The farmers were very happy with the return of their sons. The didn't have much money, but they through a big party for the adventurers.

The adventurers now had much more money than they started the journey with, and asked the farmers for directions so that they could pass a small town or village before they reached their final destination; that way they could buy some more supplies and equipment.