Monday, December 31, 2018

Viking Shieldmaidens in 28mm

Just finished painting my Viking shieldmaiden command group (Svala, Inga & Brynhildr) over Christmas. Now my warband is complete, at least until I decide to add some mounted, or until Annie tempts me with something else. All figures from Bad Squiddo Games.


Sunday, December 30, 2018

Battle of the Medellín in 6mm

Refighting the Battle of the Medellín 28 March 1809, using Commands & Colors Napoleonic Rules. Figures from Baccus, hex terrain from Kallistra, houses from TBM and river homemade.

Background:

General Don Gregorio Garcia de la Cuesta’s army was retreating in the face of Victor’s advance after being forced out of its defensive positions on the Tagus River. On the 27th of March, Cuesta’s army was reinforced by the Duke of Albuquerque, and Cuesta decided it was time to fight. The battlefield was just southeast of the town of Medellín, roughly 300 km southwest of Madrid. Cuesta’s plan was to strike both French wings and hope to catch the French army with their backs to the Guadiana River.

Victor was outnumbered, but had veteran troops who knew how to win, so he willingly deployed for battle. Victor’s plan was to keep withdrawing his flanks closer and closer to the centre until a powerful counter-attack could shatter the Spanish line. Cuesta formed his infantry into one long, thin unbroken line since his greatest fear was that French cavalry could destroy his infantry if there were gaps in the line.

At first, Cuesta’s plan seemed to be working. Lasalle’s position on the French left was at risk, but his men held on to their tenuous positions. Spanish infantry formations were also pushing forward against the French batteries on Latour-Maubourg’s hill position. Latour-Maubourg flung his cavalry into a counter attack, but the cavalry was forced into a disorganised retreat. As the Spanish infantry threatened to capture the French guns, Latour-Maubourg ordered his reformed cavalry to attack again – this time against the Spanish cavalry covering the end of the infantry line. Events now unfolded quickly. The French cavalry charge succeeded and the Spanish cavalry fled the field, exposing the thin Spanish line to a devastating flank attack. Cuesta’s left flank dissolved in panic. Lasalle and Villatte, seeing the opportunity, ordered a counter-attack that caught the right flank of the Spanish army between infantry to their front and cavalry to their flanks and rear. The result was a massacre. Entire battalions were destroyed as they tried to stand and fight, and the French cavalry showed no quarter in their pursuit of fugitives.

Over 7,500 Spaniards became casualties. In the aftermath, Cuesta’s shattered army retreated to Monasterio.
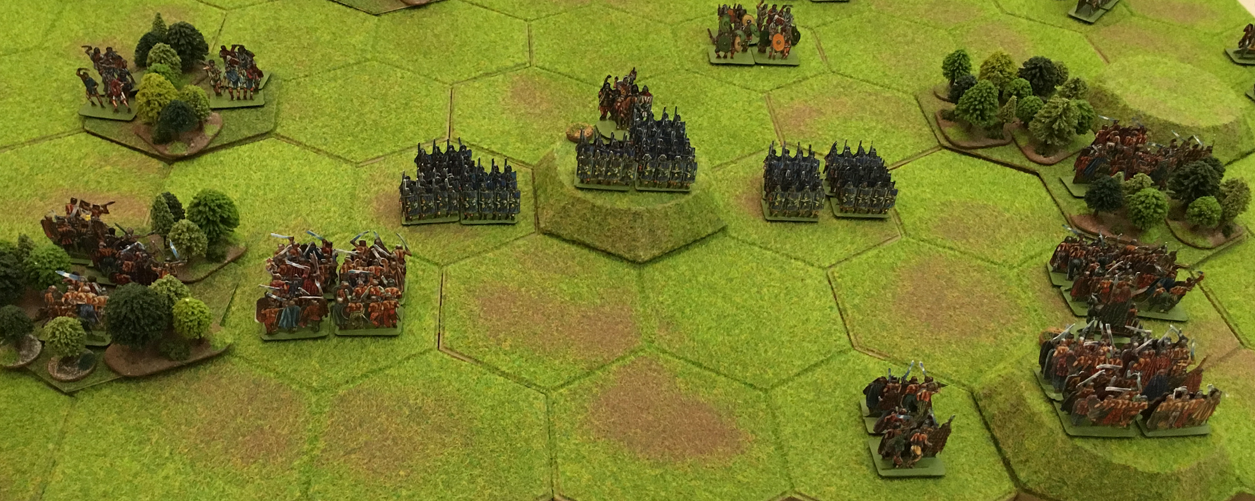
The Setup:


Special Rule:

The Spanish infantry were hastily recruited and poorly trained. The first time a Spanish unit tries to form square it must roll 3+ on a D6 in order to succeed. Each successive time the score needed increases by 1. The fourth and subsequent attempts will only succeed on a 6.

The Action:

The battle started in a historical manner, with the Spanish right wing attacking General Lasalle on the French left in the hope of trapping his troops against the Guadiana River.


The French infantry formed square to receive the charging Spanish hussars causing casualties. However the Spanish light infantry opened fire on the lines of French hussars causing casualties there.


To save their infantry, the French hussars then charged the Spanish hussars.


The Spanish hussars were defeated and the victorious French hussars then charged into the Spanish infantry behind, which took 50% casualties and then fled.


The three remaining Spanish infantry units then advanced on the French, still hoping to push them back into the river.


The French cavalry tried to retire before being contacted by the Spanish infantry but they were shot to pieces. The remaining Spanish infantry opened fire on the French square causing casualties.


The Spanish followed up there attack with a second, giving the French no chance to counterattack (Spanish Guerrilla Action Rule). They massacred the square, but Lasalle managed to flee to the safety of his supporting Horse Artillery. Even the French light infantry took heavy casualties. 


Lasalle retreated with his Horse Artillery leaving the light infantry to their fate.


A fate which was soon in coming, they were destroyed by the advancing Spanish infantry column.


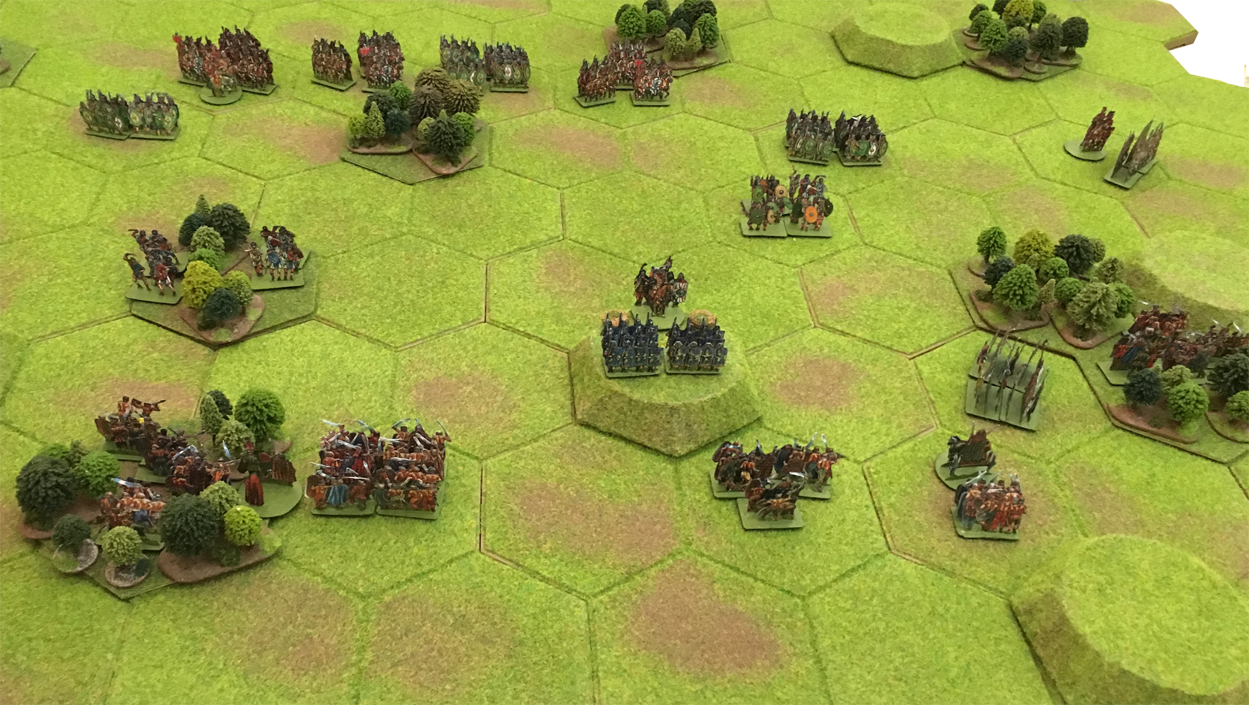
Luckily for the French, General Latour-Maubourg had brought is cavalry to support the left flank.


This caused the Spanish to retire and try and form a defensive line and gave the French the chance to bring up even more reinforcements.


The French then advanced towards the waiting Spanish line.


Latour-Maubourg charged with his cavalry, supported by the advancing infantry.


The charging French hussars were repulsed with losses by the stubborn Spanish artillery, but the following charge by the French dragoons wiped out the artillery. The dragoons then continued to charge right into the Spanish infantry behind. The infantry didn't form square and were in turn massacred by the dragoons.


The Spanish infantry the counterattacked General Vilette's French infantry column. The attack caused casualties on the French, but the Spanish lost heavily too and one Spanish infantry unit fled before the French.


Latour-Maubourg and his dragoons charged into the Spanish artillery on the hill.


The artillery were destroyed and then the supporting infantry advanced on the French dragoons. The infantry opened fire on the dragoons but with causing and noticeable losses.


The dragoons then charged the Spanish infantry, who yet again chose not to form square. The infantry were slaughtered and the dragoons charged through them and up onto the hill behind.


Seeing both their left wing and centre being wiped out by the French, the Spanish army started to slip away heading back into the safety of the mountain ranges.

The victorious General Latour-Maubourg and his dragoons.


It was however a close-run thing, the French gaining 6 Victory Banners and the Spanish 5 Victory Banners.

Sunday, November 18, 2018

Making Rivers for Kallistra Hex Terrain

I have been using Kallistra hex terrain for a while now and am very pleased with the results, especially for Commands & Colors games.

One thing that I have always thought is wrong with most wargames terrain, mine included, was that rivers and lakes were placed on top of the terrain. In the real world rivers and lakes are sunk down into the terrain. I believe that a much better visual appearance is achieved if such watercourses are sunk below the surface of the playing area. A friend of mine came up with a great way to solve this problem when using Kallistra hex terrain and I copied him. This works for rivers, shorelines and other such waterways.

Now I needed half-a-dozen more straight sections, so I decided to post a how-to here on my blog.


Here's one recipe for how to do it 

To get the river at a lower level than the surrounding ground, just use the normal Kallistra hexes but turn them upside down. This gives you a deep hole to use. To get the river to blend in with the surrounding terrain, I gave the areas nearest the edges a base coat of Dulux Salisbury Stone and flocked them with Spring Meadow as described in Kallistra's How To Guides.

List of Ingredients

  • Kallistra's single brown hexes: HEXIIS/BR Single Hex Pack - BROWN - 10 pieces plus clips 
  • N50210 Noch Flock - Spring Meadow - 100g Bag 
  • Dulux vinyl matt emulsion, colour:30YY23246, Salisbury Stone (However as this isn't available in Sweden so I used the Alcro equivalent instead: NCS S 5020-Y10R). 
  • Modelling Clay. I used Panduro's Terrakotta Hobby Clay 
  • White PVA Wood Glue. Best used when new and fresh because it loses its adhesive qualities over time, especially if it has been stored in a cold place such as a garage or shed over a winter period. 
  • Fine sand - available from any good pet shop. 
  • Green stuff. (Optional) 
  • Paint. See below. 
  • Matt Varnish. I used Panduro Oceanlack 
  • Liquitex Gloss Heavy Gel 
  • Noch 95360 Clump Foliage. (Optional) 

If you are doing a large number of hexes, using Citadel or Humbrol paints will be very expensive. I went to my local hobby/craft shop (Panduro) and purchased hobby paints much cheaper there. The ones I got had a satin finish but this doesn't matter as I intend to give them a coat of Matt Varnish. You will need the following colours:

  • Beige (Sand) 
  • White 
  • Leaf-green 
  • Grey 
  • Coffee Brown 

The Method

Step 1. Wash the Hexes.

Wash the Hexon II boards in warm soapy water to remove any release agents that may be present from the manufacturing process.

Step 2. Mark Out the River.

Turn the hexes upside down and mark out the course of the river. The hexes are structured in such a way that there is an "obvious" width and entry point in the middle of each hex side.

Step 3. Cut Out the River Entry Points.

With a saw or a sharp knife cut out the river entry points. Make sure that these are the same on all hex sides so that they match up when placed together.


Step 4. Modelling clay.

Fill the hexes with modelling clay from the river bank up to the edge of the hexes.


Step 5. Allow To Dry.

Allow to dry thoroughly. The clay may shrink slightly and/or crack when dry.


Step 6. Glue the River Banks in place.

Glue the river banks in place using white wood glue. It doesn't matter if some small cracks show as these will be covered in the next step.


Step 7. Optional - Add any terrain pieces.

Now add any additional terrain pieces. A bridge can be fixed in place (here a Stone Bridge from Irregular Miniature's 6mm Scenic Range). The bridge was raised so that it was near "ground level" and the middle pier was extended down to river level using plastic card and green stuff.


Step 8. Cover the River Banks with Sand.

Cover the river banks with white wood glue and then sprinkle them with a coating of fine sand. This should hide any cracks that appeared when the clay dried.


Step 9. Optional - Fill in any gaps at the hex edges.

I was a bit sloppy with the modelling clay and the sand - I could have been a bit more careful. There were small gaps at the edges of the river hexes which showed up when they were placed against a normal terrain hex. I filled these gaps using green stuff.


Step 10. Paint sand/beige colour.

Cover the whole river hex in a sand/beige base paint.


Step 11. Paint the River.

Mix a watery brownish colour using a mixture of two parts beige to one part coffee brown and a splash of water. Paint the edge of the river where the bank meets the hex base with a thin line of this mixture.

Allow to dry and then dry-brush over with beige to blend it in with the bank.

Mix equal quantities of leaf-green, medium grey and white and paint the river.


Step 12. Paint under the grass.

Paint the areas nearest the edges of the hex a base coat of Dulux Salisbury Stone in order that they will blend in with the surrounding terrain when flocked.


Step 13. Varnish.

Cover the whole hex in a coat of Matt Varnish.


Step 14. Water.

Create a water effect using Liquitex Gloss Heavy Gel. Apply quite thickly and work with a Games Workshop Sculpting Tool to give a running water effect. Allow to dry thoroughly before moving on to the next step, otherwise there is a risk that the flock with stick to the Gel.


Step 15. Flock.

Cover the areas nearest the edges of the hex in white wood glue and then sprinkle with Noch Spring Meadow flock.

Step 16. Optional - Add foliage.

Add some small clumps of Noch 95360 Clump Foliage to give the impression of bushes.


Job Done!

Six new straight sections...


Another picture of the river in use...


You can even use the same technique for coastal hexes instead of rivers. In this case you cut away not just the entry points but the whole of one side. You can choose a more Mediterranean blue instead of a river green colour.


Sunday, November 4, 2018

Foraging Party (54 BC)

This is the third scenario that we have played with the Romans vs the Ancient British. We will use our simple campaign rules to link these scenarios. It was planned to use the three scenarios in Expansion 2 but it is beginning to look like we will add a fourth. We are "cheating" by combining both of Caesar's campaign in Britain in order to do so.

Previously we have been playing Commands & Colors Ancients with Baccus 6mm models. However we didn't have enough Ancient British models so we played these scenarios with paper cut-out flats by Peter Dennis and Helion Publishing. Hex terrain from Kallistra.

Historical Background

When Julius Caesar resumed his march inland, the Britons united under their newly appointed leader, Cassivellaunus. He ordered his troops to avoid pitched battles with the legions. Instead, they were to just harry the flanks of the legions and to wear down the Roman cavalry by drawing them into skirmishes, only to retire after a brief fight. Caesar was impressed with the mobility and open order fighting capability of the tribesman. He countered by increasing the size of his foraging parties and emphasising the need for the legionnaires to support the cavalry. The next Roman foraging party was almost 20,000 strong, with three legions and all the cavalry. Caesar assigned the legate Gaius Trebonius to lead this detachment. Aware of the large amount of Roman infantry in the column, Cassivellaunus still broke his own rules and attacked – confident that his forces could strike and retire before the legions could close to battle. Trebonius ordered a counter attack and the Roman cavalry, closely supported by the legions, broke out of the attempted encirclement, The Roman cavalry then charged home and routed the Britons. The defeat broke the British alliance of tribes and gave Caesar temporary control of this part of the island.

The Setup

The British Right seen from the Roman lines.


The British Left seen from the Roman lines.


The Roman foraging party advances towards the awaiting British


The Action

As the Romans advanced, the British threw some light chariots and cavalry against the Roman right flank.


The British were repulsed with losses, but not without first causing serious casualties to the Roman auxilia infantry.


The Romans pushed forward the infantry in their centre.


The Romans then through a single cavalry unit at the British right flank.


This attack pushed back one British light chariot unit.


The British the counterattacked the Romans with a unit of light chariots.


The Romans now attacked with their legionary infantry in the centre.


A nasty hole appeared in the British centre.


The British counterattacked in desperation.


The British had the Gods on their side, the counterattack was successful.


Deciding he was in a precarious position, the Roman general withdrew his lone legionary unit and advanced his other troops in support.


Seeing the Romans retire, the British threw everything they could at the Romans.


But the retiring Romans were still made of tough stuff; the British charge recoiled and the Romans went on the counterattack.


British light chariots and cavalry charged a lone under-strength unit of auxilia infantry on the Roman right flank.


The auxilia decided that discretion was the better part of valour and retired. The Roman general then ignored the British troops on his right flank and instead attacked in the centre.


The Romans wiped out the last of the British warband and the rest of their army lost heart and fled the field of battle.


Result

Roman marginal victory. Prior to the final attack, both sides had equal losses. The final Roman attack tipped the scales in their favour!

What's Next?

We have now played the three scenarios for Caesar's invasions och Britain in our mini-campaign. The Romans won all three battles which is fairly historical. However they lost an Eagle in doing so. We will now try and create a new fourth and final scenario in which the Romans must rescue "The Lost Eagle".