
Mona Insulis (60 AD)
This is the seventh scenario in our campaign representing the Roman Invasion of Britain based on my own campaign rules.
The scenario was played using the Commands & Colors Ancients rules but on hex terrain from Kallistra and using paper figures from Peter Dennis instead of blocks.
The island of Anglesey (Ynys Mon to the Welsh and Mona Insulis to the Romans), rich in grain and copper mines, became a refuge for several tribes opposed to the Roman occupation of Britain as well as Rome's old nemesis the Chieftain Togodumnus. The druids there, under the leadership of Miraculix gave moral and material support to the resistance, and it was felt by Rome that Britain would never be at peace until the druids were eradicated. For those reasons the Imperial Governor Gaius Suetonius Paulinus, ordered legate Appius Titus Aper with his IX legion to lay waste to the isle. When the Romans arrived at the Menai Straits they found Mona defended by many Celtic warriors, mainly of the warlike Ordovices tribe. Tattooed with blue woad, the Celts stood taunting their enemy. Their druids stood nearby in circles raising their arms to heaven and shouting curses, while women with black robes and dishevelled hair ran here and there wailing and screaming. The superstitious Romans were rooted to the spot, terrified by this supernatural display.
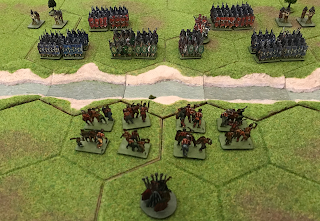
 |
| View from the British lines |
Unsure what to do, Appius Titus Aper called upon his friend, Vitriolus, who had been accompanying the legion. People believed Vitriolus to be the Emperor's spy or perhaps the bastard of a prominent senator exiled to the outskirts of the empire. However Aper was sure that the truth was even worse, that Vitriolus was a priest of a religion so secret and dark that it could never be mentioned. So Aper gave Vitriolus a large chicken, told him to sacrifice it in front of the legion and to examine its entrails. And to make damn sure that the portents would be favourable and a sign of a momentous victory. This act gave the Romans a second Glory Point to use during the scenario.
 |
| Asper and Vitriolus about to perform the sacrifice - by MW |
Appius Titus Aper took command of the left flank, Vitriolus took the right flank and the legion's primus pilus commanded the centre.
This is not an official scenario, it is scenario 17 from C3i Magazine. The Romans have 2 glory points (one from the previous scenario) and the Britons have 2 glory points. Glory points in our campaign rules are an addition to the standard C&CA rules.
 |
| The set-up |
Togodumnus was in command of the hill fort on the British left flank. Miraculix the Druid placed himself in the centre and Getafix the Druid was encouraging the right flank from the safety of the forest.
Miraculix the Druid gave a goblet of strength-enhancing magic potion to Togodumnus before the battle!
 |
| Togodumnus and Miraculix - by MW |
As the Romans approached, Miraculix ordered his light infantry to start shooting, but despite his enthusiastic encouragements, the shooting seemed to have no effect on the invaders.

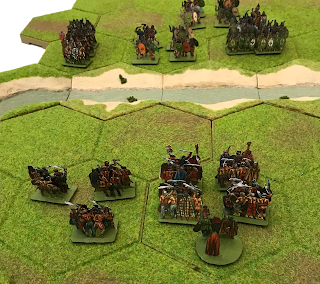
The Romans performed a coordinated attack, and both Aper and Vitriolus led their legionaries into the water. Both legionaries threw their pila at the defending Britons, the warriors on the British right flank took casualties.

Togodumnus ordered a mounted charge, before the Romans could leave the water. On the left flank two units of light cavalry charged into Vitriolus and his legionaries. On the Right flank, the British nobles in their chariots advanced towards the water.

The British light cavalry hit the legionaries, but with Vitriolus and his sacrificial dagger only a few paces to their rear, the legionaries stood firm causing many more casualties to the Britons than they took themselves.

The legionaries on the Roman left flank under the command of Aper, charged up out of the water on to dry land and attacked the waiting British warriors.

The legionaries annihilated the warriors and advanced, they turned on the unexpecting Briton to their right.

The Britons evaded the Roman charge without loss.

Getafix the Druid ordered his light troops to surround and destroy the Roman invaders. He stirred them up to a gallant and ferocious charge.

The Roman legionaries took some losses, but the attacking Britons were decimated.

Seeing the victorious Aper on the far bank, the auxilia and the cavalry advanced into the water to support him. The British chariots fought bravely but were destroyed.

Miraculix the druid orders his light infantry to start shooting at the Romans again, this time with more success, The unit of auxilia is wiped out and its leader, the Primus Pilus retires to the safety of the legions behind.
The Romans shoot back, causing casualties in one of the British light infantry units.

The British charged Aper and his legionaries with a Clash of Shields but with no effect. The Romans attacked back, destroying the British tribesmen and then killing Getafix the Druid who had been stirring up the tribesmen from what he thought was the safety of the forest.

The Romans ordered their light troops to advance and to shoot at the enemy.

On their right flank, the Romans attacked the British light cavalry, destroying them, and then advanced out of the water onto the island shore.

Fortified by the potion of strength, Togodumnus led the British charge out from the hill fort to attack the Roman legionaries on the shore under the command of Vitriolus.

The legionaries were destroyed and Vitriolus fled back across the water.
The Roman light troops were now ordered to skirmish, moving shooting and then moving again, to keep the Britons on their toes.

In an attempt to motivate his troops Togodumnus shouted out, at the top of his voice:
"I AM MOCCUS, THE BOAR-GOD"
This did not have the success he was hoping for, only one band of his tribesmen charged through the forest to attack Aper and his legionaries.

But Aper and his legionaries stood firm, causing severe losses to the attacking Britons.

Aper orders two units on his flank forward, the auxilia advances into the forest to attack the Britons while Aper leads his own legionaries forward.

The auxilia loose half their number, without doing any serious damage to the Britons. Then Aper leads his men into the forest and wipes out the defending Britons.

Scenario Result
Roman Victory: Romans 7 - Britons 2
Romans 7 victory banners and 2 glory points
Britons 2 victory banners and 0 glory points
Campaign Result
| Victories | Banners | |
|---|---|---|
| Romans | 2 | 33 |
| Britons | 5 | 37 |
Very nice, I do like that hill fort.
ReplyDeleteThanks! Made from XPS foam.
DeleteExcellent set up.
ReplyDeleteI also make paperboys armies and in fact I have bought Peter's Romans invasion in Britain book. Nowadays I'm finishing Macedonians.
You inspired me thus I own command and colors ancient, so let me ask you the size of Kallstra hex and figure's scale.
Kallista hexes are 10cm (4 inches).
DeleteThe figures are 20mm
Great report and a brilliant looking table.
ReplyDeleteCommand and Colors is an excellent system for large battles.
Frank
Yes I love the system, a great game that you can finish in an evening after work.
Delete