
Claudius in Britain (43 AD)
This is the fifth scenario in our campaign representing the Roman Invasion of Britain based on my own campaign rules.
The scenario was played using the Commands & Colors Ancients rules but on hex terrain from Kallistra and using paper figures from Peter Dennis instead of blocks.
Most of what we know from written sources about the Emperor Claudius in Britain is found in the work of Lucius Cassius Dio with a little help from Gaius Suetonius Tranquillus. This is one interpretation of those texts.
After the fight at the Medway, the Britons retired to the river Thames. They were hotly pursued by the Romans with both sides taking heavy losses; the British losses occurred when they were yet again outflanked by Batavian auxiliaries swimming (across the Thames) and the Roman losses when they were ambushed in the swamps. The Romans established themselves with 3 legions (IX Hispana, XIV Gemina; and XX Valeria Victrix) north of the Thames and one legion (II Augusta) to the south. Then Aulus Plautius halted and sent for Claudius as he had been instructed.
Claudius travelled from Rome to Boulogne where he met an escort that included elephants. He boarded a ship of the Classis Britannica, crossed the channel and followed the long established trade route via the Watsum channel, the Thames and finally the Roding to join Aulus Plautius and the legions. Taking over the command, Claudius put the legions in motion in order to take Camulodunum the capital of the Catuvellauni. He crossed the Chelmer at a ford in order to engaged the Britons, who had gathered at his approach.

The eerie Vitriolus accompanied the Emperor Claudius on his travels to Britain. Nobody seemed to know who he really was! Was he a slave, or a spy, or the bastard of a prominent senator exiled to the outskirts of the empire? And what was he doing creeping around the elephants so late at night?
 |
| Vitriolus and the Elephants - by MW |
The XX legion attacked frontally accompanied by Claudius and the elephants. The XIV legion attempted to cut of the escape route to the west and the XX legion outflanked the defensive line of the Chelmer.
 |
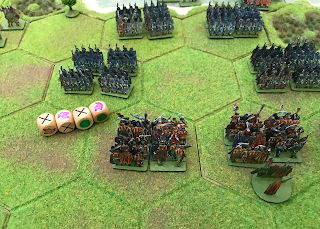
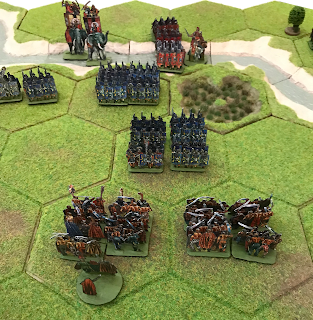
| Scenario Set-up |
This is not a published scenario, Claudius in Britain (43AD) is a scenario that I designed it myself for this campaign. The Romans have 1 glory point from the previous scenario and the Britons have 3 glory points. Glory points in our campaign rules are an addition to the standard C&CA rules.
The British drew up their warbands on the hill in the centre under the command of Togodumnus. On their right flank were their chariots and cavalry under the command of Caratacus. Hidden from view in the woods on their left flank, they had their lighter infantry units.

In the centre, Claudius ordered his units to advance over the River Chelmer. The legionaries led the way followed by the elephants and Claudius himself commanding the elite cohort. The British warriors looked upon the scene with trepidation.

In the centre, the British ordered three of their units to advance down from the hills and attack the Romans before they could deploy correctly. Togodumnus moved from the rear ranks to join they charge. This he did using a Glory Point, which is an addition to the standard C&CA rules from our campaign rules.

The left flank warriors charged into the nearest legionary unit, encouraged by the leadership of Togodumnus, they wiped out their foe.
The warriors continued their charge into the second line of legionaries, but they were less successful without the leadership of Togodumnus.

The right flank warriors now charged into the legionaries. The legionaries managed to strike first, before the charging warriors reached them.
The Britons wiped out the first unit of legionaries with only slight casualties themselves and then, with Togodumnus in the fore, they charged into the supporting unit behind.

Claudius advanced the elite legionaries and the elephants in his centre, and withdrew the decimated unit back into the river.

The elephants attacked the British warriors to their right, they caused no losses because the Britons fled to safety behind the hill.
Claudius and the elite legionaries attacked the warriors to their front commanded by Togodumnus; they destroyed the entire unit and caused Togodumnus to retreat to the warrior unit to his rear.

Claudius followed up his success, and continued his charge into the next unit of warriors.

He wiped out this second unit and Togodumnus was badly wounded in his head and carried from the battlefield by his retainers.

While Togodumnus was being carried off the field, the British decided to try their lick on their left flank. Two units advanced and a third started shooting at an Auxilia unit but without causing casualties.

Claudius then ordered his left flank infantry line to advance, planning for it to join up with his centre.
Caratacus commanding the chariots and light cavalry on the British right, ordered a pre-emptive mounted charge to catch the Romans when they were wading across the River.

The Romans were pushed back out of the river, taking some losses, but without causing the British any noticeable casualties.

The reverse did not please Claudius, who ordered the troops to double time back into the river, to attack the British mounted units. Instead of evading, the British stood and both sides took losses.

Caratacus the ordered his light troops who attacked and destroyed the Auxilia units, although they took losses in the process and the light cavalry on their left retreated to the rear of the battlefield safely behind the hills. Only an understrength Roman light infantry unit, and a cavalry unit that had remained stationary throughout remained facing Caratacus.

At the same time, one unit of British light infantry on the opposite flank started shooting at an Auxilia unit causing it to pull back without loss.

The Roman right flank was under the command of Appius Titus Aper, grandson to the famous Gnaeus Hostilius Aper. He was enraged by the Britons shooting from the cover of the woods, so he ordered forward four units to teach the cheeky Britons a lesson.

First he ordered the Auxilia to attack the woods, they caused casualties to the defending British light infantry but were then themselves forced to retreat with 50% losses.
Then Appius Titus Aper led his cavalry into the British unit that had ventured out of the woods, riding them all down without loss. The cavalry then continued to attack the British light infantry in the woods, causing them more casualties,
Finally the Roman light infantry started shooting at the second wood, causing casualties to the defending Britons.

Ignoring the action taking place on the other flank, Caratacus rallied his chariots and ordered his light troops. He attacked and eliminated the understrength Roman light infantry unit. However he decided not to push his luck and didn't attack the full-strength Roman cavalry unit.

On the Roman right flank, Appius Titus Aper ordered his cavalry and his three infantry units to attack.

The Roman attack wiped out the British light infantry in the wood on the extreme flank as well as causing casualties to the British troops in the other wood. However the British defence was fierce, causing losses to both the Roman cavalry and to their light infantry.

After Appius Titus Aper's heroic charge, the battle was now hanging in the balance, if either side could gain one more Victory Banner then they would be victorious.
Seeing that the Roman light infantry was in a precarious position, very weak and with no possibility to evade, the British commander ordered two units to advance and attack.

The Roman light infantry put up a brave fight, but they were eventually wiped out by the Britons.

Togodumnus was badly wounded in the head and carried from the battlefield by his loyal retainers. He was carried into the west country where he recovered and would return to fight the Romans yet again.
 |
| The wounded Togodumnus - by MW |
Scenario Result
British Victory: Romans 5 - Britons 6
Romans 5 victory banners and 1 glory point
Britons 6 victory banners and 2 glory points
Campaign Result
| Victories | Banners | |
|---|---|---|
| Romans | 1 | 22 |
| Britons | 4 | 29 |
Fabulous, the table looks great, as do the armies, those elephants look amazing in their paper format.
ReplyDeleteThanks Norm! I was really impressed by the paper figures from Peter Dennis. Coming soon some paper ballistae to keep those British under control!
DeleteGame looks terrific on your hex terrain. Playing CCA with miniatures is the way to go in my book.
ReplyDeleteThanks Jonathan! Yes the big 10cm/4inch hexes from Kallistra give you plenty of room for miniatures.
Delete