Sunday, October 6, 2024

Second Punic War - Ticinus River (218 BC)

This is the first scenario in our campaign representing the Second Punic War based on my own campaign rules

The scenario was played using the Commands & Colors Ancients rules but on hex terrain from Kallistra and using 6mm figures from Baccus instead of blocks.

The History

Hannibal has completed his epic march across the Alps, but has lost fully half of his soldiers in doing so. The Consul in Southern Gaul, Publius Cornelius Scipio, has shadowed Hannibal’s advance following the coastal route. He intercepts Hannibal in Northern Italy as he is rebuilding his army with Gallic recruits. Neither commander is willing to bring on general battle, but Scipio does advance his light troops and cavalry, unaware of how much better the Carthaginian cavalry was than his own. Hannibal counters with his cavalry, including the fearsome Numidian light horse. Hannibal gives Scipio a tactics lesson. His heavy cavalry smashes into the light infantry, drawing the Roman cavalry into the fight. At that point, the Numidians hit both flanks, driving off the disorganized surviving cavalry, wounding Publius Scipio in the process. One capable Roman now knew how formidable Hannibal’s army was. Unfortunately, three other inept Roman Consuls would lose thousands of Roman soldiers at The Trebbia, Lake Trasimenus, and Cannae because they failed to heed the warnings.


The Refight

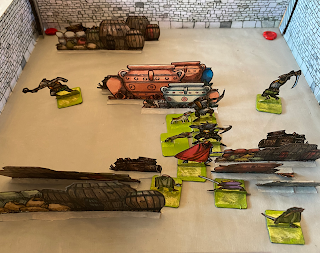
The Romans and the Carthaginians faced off against each other. Rome at the bottom of this picture, and Carthage at the top.

View from the Roman lines

The Carthaginian Commander ordered one unit of Heavy Cavalry in the centre to advance and supported this with one unit of Light Cavalry on each flank.

The Roman Consul, countered this by advancing his whole line of light infantry.

The Carthaginian Commander continued with his strategy and ordered one more unit of Heavy Cavalry in the centre to advance and supported this with one more unit of Light Cavalry on each flank.

The Roman consul ordered his light infantry to skirmish with the advancing Carthaginians. The light infantry rushed forward, hurling their javelins at the enemy, but before the cavalry could react, the light infantry returned to their original positions.

The Carthaginian Commander ordered forward his two remaining heavy cavalry units in the centre to complete the line.

The Roman consul ordered the light infantry to remain in place, not wanting to enter charge range of the Carthaginians.

The Carthaginian Commander ordered forward his left flank Numidian light cavalry, to skirmish using their javelins against the Roman medium cavalry and light infantry. They caused some casualties among the light infantry, but the medium cavalry stood firm against them.

As the advanced, the Roman cavalry caused the Numidian light cavalry to retire before them. This allowed the Roman cavalry to surround one unit of Numidians with their commander Mago.

But unfortunately for the Romans, Mago resisted and the attack didn't go as planned, and the Romans took heavy losses and retreated.

The Carthaginians ordered forward their Numidian light cavalry on their right wing, and withdrew what was left of Mago and his Numidians on their left wing.

The Romans ordered forward their 2 units of medium cavalry onto their left wing in order to counter the advancing Carthaginians.

Hannibal led his heavy cavalry in a mounted charge straight at the Roman light infantry in the centre.

Seeing the charging Carthaginian Cavalry, the Roman light infantry chose to evade and fell back towards the relative safety of their own cavalry, taking only slight losses in the process.

Publius Cornelius Scipio chose to counter attack, and led his medium cavalry in a charge straight at the Carthaginians.

The Carthaginian cavalry we wiped out, but with severe losses to the Romans, and Hannibal was forced to flee for his life.

Marharbal, the Numidian commander, led his cavalry in a charge at the remains of the Roman medium cavalry.

This charge was a great success and destroyed all but one of the Roman cavalry units.

The battle now hung in the balance, with both Carthaginians and Romans sensing the possibility of either victory or defeat.

The Roman centre tried a final attack on the Carthaginians, but failed.

The remaining Roman light infantry withdrew, leaving the Carthaginians in control of the field of battle.


Scenario Result 

Carthaginian Victory: Carthaginians 6 - Romans 5


Campaign Result 

  Victories     Banners  
  Romans       0     5
  Carthaginians       1     6


Friday, June 14, 2024

Four Against Darkness #3

This is the third episode in the story of a party of adventures who took up the fight against darkness in search of fame and fortune within the deep and evil dungeons. 

It was played using the Four Against Darkness, (4AD), a solitaire dungeon-delving game written by Andrea Sfiligoi from Ganesha Games

SPOILER ALERT: This adventure was based on the Caves of the Kobold Slave-Masters. Read no further if you are planning on playing that book!

The party consisted of Sir Dancealot the warrior, Father Braun the cleric, Little Tam the rogue and Salubran the wizard. 

The party were resting, recuperating and restocking with supplies in the town of Trumpton when, while drinking in the Gnoll’s Head tavern, they started hearing rumours of the kobold slave-masters. 

The kobold slave-masters are a plague upon the lands, capturing goblins and other creatures. Recently, they have even captured Elvyn, an old, much-loved adventurer who started to police their area, wanting to put wrongs to right. However, in a new development, an escaped goblin has revealed the location where the kobolds keep Elvyn. 

The Trumpton town council has hired the party to rescue Elvyn, offering a reward of 100 gold coins for the safe return of Elvyn before nightfall. It would be a bonus if it could be discovered why the kobolds are acting so aggressively of late. 

The party journeyed to the revealed location, entered the cave, where they found a flight of stone stairs descending into the darkness of the kobolds’ lair. It was worrying that an unnatural sense of dread permeated the air.  

The party descended with Little Tam and Sir Dancealot in the lead followed by Father Braun and Salubran. 

The party turned left and went into the first chamber. There they found a goblin chained to a wall. After a quick conversation, with Rikka the goblin, the party decided to free him. The chains were weak and rusted, so this was easily achieved. Rikka was in a sorry state because of the evil kobolds, so the party bandaged Rikka's wounds. He offered to join and help the party if he was rewarded with 20 gold coins per adventure, a deal which the party accepted. Salubran lent Rikka a dagger with which to defend himself.


The party then went to the chamber opposite. The chamber contained a pool of water. Rikka who was extremely thirsty after being chained up decided to take a drink, the other party abstained. Luckily for Rikka, the pool contained nothing other than pure fresh water.

The party continued into the dungeon still with Little Tam and Sir Dancealot in the lead, now with Rikka in the centre where he should be safe, and bringing up the rear were Father Braun and Salubran. 

They came to a pair of doors, one on the right wall of the passage and one on the left. The party chose the left door and entered. When the opened the door, they saw that the room contained a chest, presumably full of the kobold's treasure. 

As they entered the room, Little Tam was attacked by a magically-animated noose. It descended from the ceiling and tightened around her neck. But Little Tam is a rogue, and a devil with a knife; she whipped out her knife and cut the rope before it could strangle her.

The chest was found to contain 50 gold coins which the party appropriated..

The party then explored the room opposite which was a library, although rather worrying as the party didn't believe that kobolds could actually read, There were two tables filled with dusty old books, tomes and scrolls.

The party decided to search and told Rikka to do so. However Goblins don't really understand such things and Rikka didn't find anything of interest except a small scorpion which he crushed without problem with the pommel of his dagger.

Father Braun pushed Rikka to one side and performed a proper search, he uncovered a Scroll of Lightning Bolt and a document containing a clue. 


The party proceeded down a corridor and into a chamber where they came face to face with a ferocious Ogre. Before the Ogre could react, Sir Dancealot attacked explosively with his two-handed sword severely wounding the Ogre. Father Braun swung with his mace but missed completely. Little Tam sneaked round the side of the Ogre and struck the Ogre in its back with her short sword and killed the Ogre.

Around the Ogre's neck hung a gold pendant. Little Tam cut it loose with her knife and examined it carefully as only a rogue can, deciding it was nothing special but melted down would be worth 80 gold coins.

The party continued on through a short narrow corridor. The corridor was filled with spider webs. Fearing venomous arachnids, it was unanimously decided to leave well alone and not to start searching.

In the next room, the party was confronted by a pulsating sphere of glowing red energy. The party looked reluctantly on, as Salubran the wizard, pushing his comrades aside, moved forward to inspect it.

The wizard touched the sphere with the index fingers of both his hands and two clues were revealed to him.

The next room was an armoury guarded by 6 kobold minions. The party set about the kobolds with Sir Dancelot, Father Braun and Rikka all killing kobolds. By the time Little Tam got into the fight, there were hardly any kobold left, so she managed to sneak behind and attacked withd eadly effect finishing off the final opponent.

The room was full of weapons. Many of these were of a small size which fitted Rikka perfectly. So Rikka was equipped with a hand-axe, leather armour, a shield and a short bow.

The party continued in what had now become their standard marching-order with Little Tam and Sir Dancealot in the lead, Rikka in the centre where he should be safe, and bringing up the rear were Father Braun and Salubran. 

In the next room, the party encountered a Troll. He was a greedy weapon collector, and was caught unawares while he is polishing a sword.

Knowing that Trolls regenerate, and that the best way to stop that was fire, Salubran the wizard started the combat by launching a fireball at the troll. Every member of the party attacked, Little Tam missed with her attack, but the remaining party members - even Rikka - wounded the Troll and he died.

Except for Rikka who had just equipped himself, each party member picked a very good quality weapon from the troll's collection. Unfortunately none were magic.

The party decided that Salubran needed more protection than Rikka, as Rikka now had armour and a shield; so Salubran and Rikka swapped places in the marching order.

The party continued to advance through the dungeon, but found their way blocked by a fast-flowing subterranean river. The river was crossed by a rickety run-down wooden bridge covered in mysterious runic writings. On the other side of the river the party could see two imposing portals.

Salubran the wizard tried to decipher the mysterious runic writings, He was pretty sure that the strange shapes on the bridge were some sort of defensive runes. They could have been a trap or an alarm, and he knew no way to disenchant them, so he declared that it was probably better not to walk on the bridge.

Using Little Tam's rope, the party roped themselves together and decided to wade across the fast-flowing river. The current was extremely strong and both Little Tam and Salubran lost their footing and were bashed against the stone side wounding them both. 

Once across, the party took out two sets of bandages and bound both Little Tam and Salubran's wounds.

The party decided to see what awaited behind the right-hand portal.

Sir Dancealot kicked open the portal and the party rushed in.

Elvyn, the old adventurer, was in this room chained to the far wall. Eight kobold slave-masters were tormenting him with their whips.

When the party entered, the kobolds turned to them and demand a ransom of 200 gold coins in order to free Elvyn. 

To pay the ransom, the party handed over the Fool's Gold that they had found in the Chaos Lord's treasure horde in a previous dungeon. Fool's Gold is magical (but fake) gold pieces; no matter what sum the seller asks, the gold will always appear enough to satisfy their greed.

Having rescued Elvyn, the old adventurer, the party left the dungeon without trying the one remaining door. The retraced their step back to the cave entrance and thence to the town of Trumpton.

Back in Trumpton the party received their promised reward of 100 gold coins. They immediately sold the Ogre's pendant for another 80 gold, and together with the 50 gold they found in the chest gave them 230 gold of which they gave Rikka 20 gold coins as a reward for joining the party.

The party also used 20 gold coin to replace the bandages used during the adventure. 

Elvyn was aware that although he was free, the kobold slave masters were not yet defeated. Unlike Rikka, the old adventurer Elvyn was too weak to embark on another adventure, but offers to lend his magic sword Ailisia to Sir Dancealot for the next adventure.


Wednesday, June 12, 2024

Rangers of Shadow Deep - Tor Varden, The Lower Level

The fourth scenario from Rangers of Shadow Deep Standard Edition. Played with Martin's hand-drawn 20mm figures and pop-up terrain. 

The Scenario

After the encounter at the bridge, you and your companions were able to slip past a couple of other gnoll patrols and reach Tor Varden. There were no guards posted outside, and very little indication of anyone inside. Then a muffled scream came from somewhere in the tower. It was a sign both good and ill. There is at least one man alive in Tor Varden, but you might already be too late to save him. You will need to move fast.

Our band of heroes consisted of two Rangers and their Companions: 

Ranger Alan De Paladin with his companions Bill Bagskott the Archer and McGregor the Dwarf.

Ranger Rogon Gosh Shadowstalker with his companions Geoffrey the Archer and Bill & Bull the Warhounds. 

The party had found keys at the Gnoll camp guarding the river crossing, they had recognised them as the keys to Tor Varden, so they knew that entrance to the tower should be easy.

In the room behind the first door, the Gnolls had constructed a torture room. Two badly beaten prisoners were shackled to the wall opposite the doorway. In the centre of the room was another prisoner and a Gnoll Sergeant. Two other Gnoll Fighters are in the room.

Alan De Paladin, Bill Bagskott and McGregor rushed into the room, attacking and killing the nearest gnoll fighter.

The Gnoll Sergeant and the remaining Gnoll Fighter charged at the heroes. Alan De Paladin was badly wounded.

Ranger Shadowstalker now rushed in with his companions Geoffrey the Archer and Bill & Bull the Warhounds to support the of Alan De Paladin. Both the Gnoll Sergeant  and the Gnoll Fighter were killed.

The party discovered the watchtower’s dog, licking its wounds in a corner. This encouraged Bill & Bull and increased their determination, courage, and ability to resist magic spells.

Shadowstalker, with Bill & Bull at his heels, rushed over to the centre prisoner and untied him. He joined the heroes as a man-at-arms. The two prisoners chained to the wall are too badly wounded to help the party, who planned to come back and help them later.

Geoffrey the Archer examined the far door, while Shadowstalker cast a healing spell on the badly wounded Alan De Paladin.

Behind the next door was a Storage Room. This room was filled with boxes, crates, bags, and barrels. 

The heroes prepared to enter.

With Shadowstalker and Bill & Bull in the lead, they charged the nearest Gnoll Fighter.

As the fight continues, the Gnolls in the room closed in on the heroes.

From behind cover, Geoffrey the Archer took a pot shot at a Gnoll Fighter but without killing him.

The first Gnoll Fighter died as the fight continued.

Bill Bagskott and McGregor killed the Gnoll fighter nearest the door, while at the same time the other heroes finished of the rest of the Gnolls.

When the fight was over, the party searched for clues and treasure; they found a Philtre of Fairy Dust containing one dose and bottle of the kingdom’s famous Golden Beer renowned for its healing properties. 

The heroes then readied themselves in front of the third door.

Behind that door was the Shaman’s Workshop. Whatever this room once was, it has been completely transformed into a horrific workshop. The room contained some scattered furniture, all of it covered in animal parts. In the centre of the room stood a table with an inanimate flesh golem lying on top of it. Next to the golem stood a Gnoll Shaman. Two Gnoll Fighters were between the table and the entrance door. 

Shadowstalker and Bill & Bull attacked and killed the nearest Gnoll.

The rest of the party moved up to help, and the Gnoll Shaman attacked.

The heroes quickly killed the last opposition so that the Shaman had no chance to animate the flesh golem.

The party rest to recover their health before deciding to continue up the tower.