Sunday, September 16, 2018

Commands & Colors Quatre Bras in 6mm

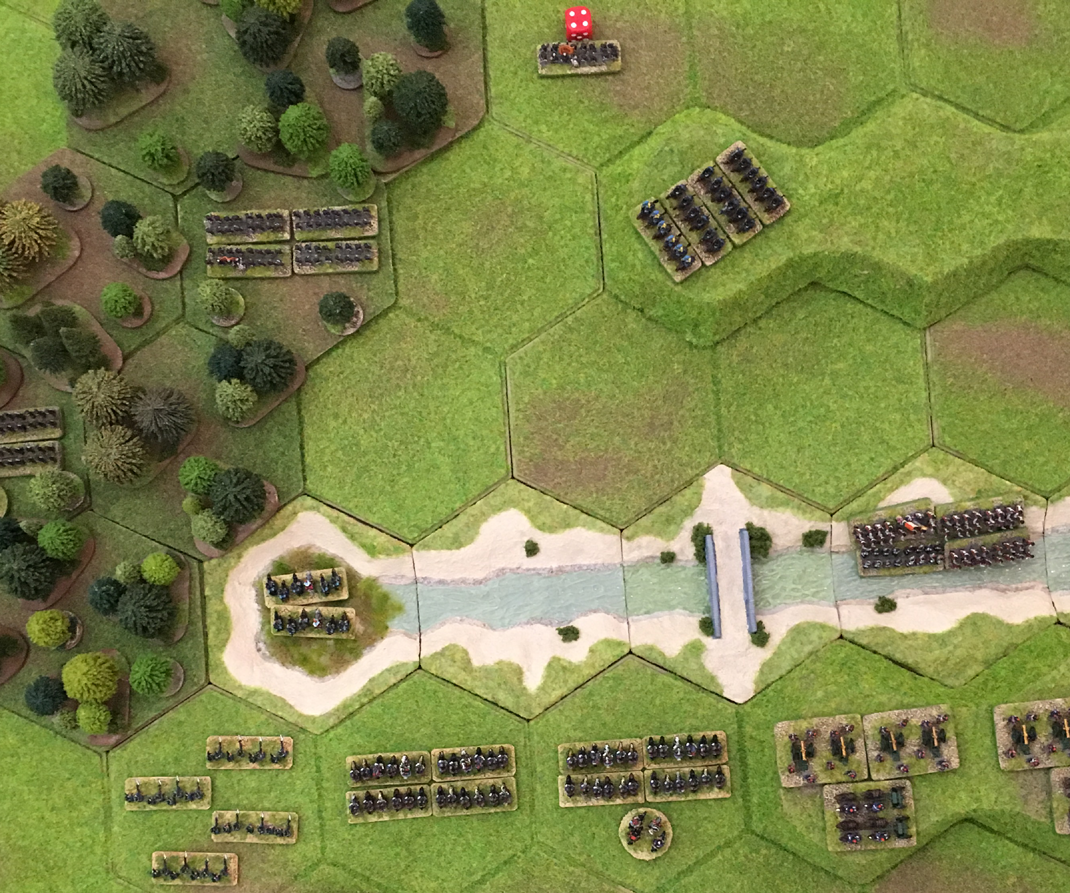
The Battle of Quatre Bras, 16 June 1815, using Command & Colors Napoleonic Rules (CCN). Figures from Baccus 6mm range, hex terrain from Kallistra, houses from TBM, trees by Timecast.

The Scenario

We didn't use the standard CCN scenario, but an alternate scenario I wrote. This scenario was inspired by William Barnes Wollen's painting of the battle: Black Watch at Bay.


Wollen's Black Watch at Bay

To this end the French lancers have been added and one of Picton's units upgraded to GR to represent the highlanders. Kellermann's Cuirassiers and Cooke's Foot Guards are no longer available at the start of the battle.

The Setup


Quatre Bras is an objective hex for the French player. If a French unit occupies it at the start of the French player's turn, then the French gain 2 Victory Banners. This applies as long as the unit remains on the objective hex. If it moves off or is eliminated, it no longer counts. The French cannot win unless they occupy Quatre Bras. If the British get 9 Victory Banners after the French have already done so but without holding Quatre Bras then the game is a draw.

The battlefield from the east.
All reinforcements arrive immediately for both sides when a French unit comes within 5 hexes of the British edge or a British unit (including allies) comes within 3 hexes of the French edge.
  • The British place 2 x GG and 1 x FA in any hex with an orange border. 
  • The French place 2 x CU and General Kellermann in any hex with an green border. 

British reinforcements -  off table
French reinforcements - off table

The Battle

The battle started when Marshal Ney ordered an artillery bombardment by the French which caused two Dutch-Belgian units light casualties, however they quickly retreated from their hill positions and took cover in the protected ground behind.


Deciding that the position on the hill was too precarious, the Prince of Orange pulled back his remaining Dutch-Belgian and Brunswick units to safety.


Encouraged by the sight of the retreating allies, Ney ordered his infantry to advance through the shallow brook.


The Brunswick artillery opened fire on the French infantry causing casualties.


Upset by the effectiveness of the Brunswick artillery, Ney ordered his light cavalry to lead an attack on the battery.


The Brunswick artillery took serves losses but the French light cavalry was repulsed and retreated back into the brook.


Not one to give up easily, Ney ordered the light cavalry to charge the remains of the Brunswick battery, this time he supported his cavalry with artillery fire. Kellermann was ordered forward in support with his cuirassiers.

The remains of the battery was overrun and the cavalry then charged towards the remains of a Dutch-Belgian infantry unit behind it. The Dutch-Belgian took casualties but managed to form square just in time.


The Brunswick light cavalry, led by their Uhlan squadron, charged over the hill into the flank of the French cavalry. The French retired back to the brook and the Brunswickers decided not to follow.


The French artillery opened fire on the Brunswick light cavalry which retired again behind the hill.


Wellington had now arrived. He ordered the Brunswick infantry into Quatre Bras and their cavalry to move in support. This would leave room to deploy Cooke's Foot Guards.


Seeing the Foot Guards marching in the distance, Ney ordered his infantry to perform a bayonet charge up the ridge. Both the Dutch-Belgian infantry and the Brunswick light cavalry took losses and retreated before the advancing French who now had Quatre Bras in their sights.


Wellington positioned the Foot Guards in the gap between Quatre Bras and Bossu Wood.

The Prince of Orange ordered a Dutch-Belgian infantry unit to attack uphill and take the French on the ridge in the flank. The attack was supported by long range artillery fire from a Royal Artillery battery which had be stationed in reserve.


The French took severe losses but still managed to push back the attacking Dutch-Belgian infantry who had only received light casualties.


The French on the ridge exchanged fire with the Allied. The French loosing that exchange.


Kellermann's cuirassiers moved up across the brook to support their infantry.


The Prince of Orange ordered his Dutch-Belgian infantry up for a second attack against the French on the ridge.


The Foot Guards and the Brunswick infantry in Quatre Bras exchange fire with the French infantry on the ridge, greatly reducing their strength.


Kellermann's cuirassiers charge over the ridge and into Cooke's Foot Guards in the gap between Quatre Bras and Bossu Wood.


The cuirassiers were received by a first volley from the Foot Guards which decimated the cuirassiers. However to do so, the Foot Guards didn't form square which meant they took casualties from the cuirassiers.


The Foot Guards were rallied by Wellington and fired upon the cuirassiers at close range. Half of the remaining cuirassiers fell as casualties and Kellermann retreated with few survivors to the protection of his artillery.


The French moved their infantry to their right in order to attack the lone Dutch-Belgian infantry unit that the Prince of Orange had left unsupported.


While this was happening, Wellington ordered the Foot Guards to advance.


The French continued their attack on the lone Dutch-Belgian infantry unit, this time supported by artillery fire from across the brook.


The French attack was successful and the Dutch-Belgian infantry fled from the battlefield.


The rifles advanced on the Allies' left flank and took up position at the edge of the woods in order to start annoying the French.


The British Foot opened fire on the advancing French after the Dutch-Belgians had fled. The French took casualties but still held the ridge!


Wellington didn't like the threat still posed by the cuirassiers so he ordered his infantry to open fire on them.


The French infantry were rallied by their general and then they charged the waiting British.


The British Foot pushed back the French infantry and then advanced attacking again.


But the French infantry unit was now alone and surrounded by enemy troops. Fire from the surrounding muskets and cannon destroyed the unit and their General fled to safety.

The momentum now left the French attack. They didn't have enough fresh troops to be able to take Quatre Bras. However they had caused the Allies serious casualties too.

Result

Minor Allied Victory.

Wednesday, September 5, 2018

Balloon Busting Mission

We have been playing a lot of of WW2 Wings of Glory so just for a change I brought out a WW1 balloon and the original Wings of War starter set. Great fun getting these old planes on the tabletop again.

The Briefing

France - February 12th, 1918 – Officers’ Billets - Premier Escadrille International

You are woken up by a sharp knock on the door, and your batman rushing in with a mug of scolding hot sweet tea. Sorry Sir, he shouts, you’ve gotta get up, the CO’s having a fit, there’s a briefing in the Officers’ Mess in 10 minutes. You gulp down the tea, burning your lips in the process, while hastily donning your uniform.

You rush into the corridor, while still doing up your trousers and arrive in the Mess hall just as the Intelligence Officer ‘Daddy’ Wilson taps the blackboard with his swagger stick. “What ho chaps. We have a sticky one for you this time”, he says, “69 squadron led by ‘Jack’ Russell had a go at it yesterday afternoon, but with no success at all. Now’s our chance to show the Hun a thing or two, and take 69 squadron down a peg or two at the same time”.

Tapping the map drawn on the blackboard a few more times ‘Daddy’ continues, “Pay attention now chaps, we have a push coming soon around here, and we will be bringing up tanks to support it. The dastardly Hun has been using an observation balloon to spot for the artillery firing on our reserves marching up to the front. It would be disastrous if they catch sight of the tanks moving up and even worse if the can target them with accurate heavy artillery fire. We must shoot down that balloon!” 


“As I’m sure you are aware, the Hun will start winching down the balloon just as soon as he sees us, so we have to get in fast. It’s damned unsporting to shoot a balloon once it’s on the ground, not cricket at all, I mean, not even the Huns do it!”.  “The other thing is that 69 squadron’s visit yesterday has probably stirred up a hornet’s nest. So we can expect the balloon to be protected both by scouts and Archie.”

Then he gives a little smile and says, ”But we have devised a cunning plan, we’ll send two scouts to shoot up their aerodrome at dawn while the other two will attack the balloon just as it’s gone up. You two will be the aerodrome mission”, and then pointing at you, “and you two get the glory of seeing the balloon go down in flames.”

“Take off will be in an hour, so go check your machines. And by the way, do you chaps remember that old Nieuport 16 at the back of the hanger? Not much of an aeroplane what, but it has the gubbins to fire those Froggy Le Prieur rockets. So if any of you want a go, it might make a nice fireworks display.”

The Action

The balloon-busting pilots went out to their aeroplanes, a Sopwith Camel and a Spad XIII. On the way they popped into the hanger but neither of them liked the look of the old Nieuport 16, even if it could have rockets fitted. A modern aeroplane and two reliable machine-guns were just what this job needed. 

The two allied scouts headed straight for the balloon, wondering where the Hun defenses were.
 

They did not wonder for long, soon two Hun scouts were spotted. At the same time the Huns started to winch down the balloon to safety.


The allied scouts ignored the Huns and went straight at the balloon, opening fire at once.


A lucky burst of fire from the Spad XIII caused the balloon to immediately catch fire.


The next burst of fire from the Spad XIII caused a second fire to start at the other end of the balloon. The balloon was now as good as doomed.

The balloon's two observers jumped to safety using their parachutes. The balloon observers were the only people routinely outfitted with parachutes, which had been available since 1915. The parachutes had a failure rate just high enough to ensure that observers jumped only in dire emergencies. With the balloon now burning in two places, it was a dire emergency!


Now the Hun scouts attacked the allies, a dogfight in the shadow of the burning balloon. 


The aeroplanes shot past each other, the Albatross D.V missing the balloon cable by only a hairs breadth.


The Allies both performed Immelmann turns, somewhat to the surprise of the Hun in the Fokker Dr.1. The Albatross D.V was having rudder problems and zoomed straight ahead.


Both Allied scouts opened up on the Fokker Dr.1 and all 4 allied machine-guns immediately jammed. The Fokker however returned fire without problem.


Even with rudder trouble, the Albatross D.V managed an Immelmann turn to return back into the fray. The Fokker Dr.1 turned tightly but failed to get on the Camel's tail.The two allied scouts headed straight at the balloon trying hard to unjam their machine-guns. 

The Spad pilot was starting to wonder how clever it was to be this close to a burning balloon which could explode at any moment.


The allies were still trying to unjam their machine-guns. The Fokker Dr.1 got onto the tail of the Camel and gave him a nasty burst. The Albatros D.V came out from his Immelmann and opened up on the Spad XIII.


Now both allied scouts were in a bad position. Perhaps they should have been concentrating less on the balloon and more on the enemy scouts.


Another burst of fire from the Fokker Dr.1 and the Camel was done for. A lucky burst from the Albatross and two bullets went straight through the Spad XIII's pilots head killing him instantly.


The Hun pilots claimed a victory, having shot down their two opponents and they celebrated with liberated French Champagne when they returned to their aerodrome. 

The Allies had shot down the balloon which meant that they offensive was safe, the Huns won't know that the tanks are coming and there will be no accurate artillery fire. However there was no celebration in the Premier Escadrille International's Officers' Mess.

Saturday, September 1, 2018

Battle of Britain - Scenario 15 - August 16th 1940 – The Few


This is the fifteenth scenario in a Battle of Britain campaign that follows the exploits of the fictitious Country of Dampshire 369 Squadron Auxiliary Air Force. We use the Wings of Glory WW2 rules, slightly modified to give faster play, together with our own set of campaign rules. We use the Wings of Glory planes where the right model is available, other manufactures are used to fill in the gaps.

The Background 

On August 16th Winston Churchill, together with Major General "Pug" Ismay spent the day at 11 Group’s headquarters at Uxbridge watching Air Vice Marshal Keith Park and his team handling one of the busiest days of the Battle. The Luftwaffe continued to pound the airfields of Southern England. 

Afterwards, in the car, Winston said “Don’t speak to me, I have never been so moved”. After several minutes of silence he said “Never in the history of mankind have so many owed so much to so few”. Ismay then asked “What about Jesus and his disciples?” “Good old Pug,” said Winston, who immediately changed the wording to “Never in the field of human conflict ....” The sentence would form the basis of his speech to the House of Commons on August 20 which will forever be associated with the Battle of Britain. 

‘The gratitude of every home in our Island, in our Empire, and indeed throughout the world, except in the abodes of the guilty, goes out to the British airmen who, undaunted by odds, unwearied in their constant challenge and mortal danger, are turning the tide of the World War by their prowess and by their devotion. Never in the field of human conflict was so much owed by so many to so few.’ 


Some airfields were protected by PAC (Parachute and Cable) launchers which were a highly unusual anti-aircraft weapon that made its combat debut in the battle. It was used to protect airfields against low-flying aircraft where barrage balloons would not be appropriate. PAC consisted of nine small rockets trailing a steel cable, which shot vertically 300-400ft into the air and then descended on parachute, creating a web of steel cables across the path of a low-flying aircraft, causing it to catch the wires and stall to the ground. PAC launchers are known to have downed a Do 17 at RAF Kenley and a He 111 at RAF Watton. 

The Action

The fitters had been working all night. They were rather pleased with what Cholmondeley Featherstonehaugh had brought on his Queen Mary. There it stood Cholmondeley's shiny new Spitfire Mk II onto which the fitters had bolted the tatty pair of wings that Cholmondeley had brought with him on the trailer. 

"There's this place near Cholmondeley that makes wings, and I got them to fix up this old pair by replacing half the machine-guns with two Swiss 20mm cannons. I thought if they can make cuckoo clocks, cannons must be easy!", said Cholmondeley. 

"I'm going to call it the Mk II B", he explained, "B because it's so much better than your planes!". 
 "And we'll call yours the Mk II A", he continued, "A because they're so very awful!". 

The Luftwaffe attack was spotted on radar as they gained height over the French mainland. Two Junkers Ju 87 B Stukas escorted by two Messerschmitt Bf 109 E-4 fighters. No. 369 Squadron was scrambled, Cholmondeley in his new Spitfire Mk II B and Sir Price in his Mk II A. They met the German's as they crossed the south coat of England heading for a Fleet Air Arm airfield. 


Cholmondeley Featherstonehaugh shouted Tally Ho and went straight at the Germans. Sit Price was more careful and tried to get behind them to attack. 


Cholmondeley ignored the defending fighter and opened fire on the Stukas with his cannon. The 109 in turn opened fire on Cholmondeley. Cholmondeley's plane caught fire, was it a lucky shot from the kraut or was there a problem with the installation of his new Swiss Hispano cannon; the fitter Walker can't be trusted to do anything right. 


Sir Price was trying to get into a tailing position on the Stukas, but a Me 109 spotted him and turned to intercept. 


Meanwhile Cholmondeley, ignoring the flames coming from his wings, turned onto the Stukas and gave them another blast from his new cannons. 


The Stukas' rear gunners opened fire and Cholmondeley's Spitfire gave up and dived earthwards. 


Both 109's now turned on the lone Sir Price. 


Chased by the 109's, Sir Price headed for the Stukas! 


Sir Price could feel that his plane was beginning to fly strangely, so he exchanged shots with a passing Stuka and then dived for home. 


The Stukas continued to attack the airfield and then escorted by the 109s then turned for the Pas de Calais and home. 

Cholmondeley crashed his Spitfire deep into the mud of a Kent field. While any landing you can walk away from is a good one, his twisted leg would keep him out of action for a while and the Spit would never fly again. 

Result

German Victory  
  • Leutnant Fritz von Spy und Spe: 1 Kill. 
  

Battle of Britain - Scenario 14 - August 15th 1940 – Hit the Airfields

This is the fourteenth scenario in a Battle of Britain campaign that follows the exploits of the fictitious Country of Dampshire 369 Squadron Auxiliary Air Force. We use the Wings of Glory WW2 rules, slightly modified to give faster play, together with our own set of campaign rules. We use the Wings of Glory planes where the right model is available, other manufactures are used to fill in the gaps.

The Background 

The fine weather was what Göring had been waiting for. Earlier that morning the 3 Luftflotten were busily preparing for a major coordinated attack on the RAF. The intention was to hit as many RAF airfields as possible and to bring up as many British fighters as they could, which could then be shot down.


The Action

Pilot Officer Cholmondeley Featherstonehaugh was still being patched up by the squadron doctor when the alert came. So it was Pilot Officers Sir Price and Emmett Hollingberry who scrambled in their Spitfire Mk IIs to meet the incoming bandits.

Two Messerschmitts, a 109 E-4 and a 110 C came in fast and low, belting towards the airfield.

Sir Price followed by Hollingberry tried to get behind the Huns, but the were spotted and the Germans turned towards them.


Soon a swirling dogfight occurred. Despite the Me 110's lack of maneuverability, it seemed to always have its forward guns pointing at a Spitfire. Somehow the Me 110 seems to lock onto Sir Price's tail!


The Bf 109 didn't want to be left out, and after a head-on pass its cannon fire set Hollingberry's Spit ablaze.


Sir Price couldn't shake the Me 110 off his tail in time; he had to bale out as his Spitfire disintegrated around him.


Hollingberry tried to get on the tail of the Me 110 in order to avenge his friend, but he couldn't manage it before a combination of the fire and the 109 behind did for him too. Even he baled out.


Both British pilots parachuted down into a field, unhurt and unhappy. As they walked back to the airfield they could hear the Germans shooting up the place.

Arriving back they found the Officers' Mess destroyed and the NAAFI van on fire. Walking past the van, Sir Price thought it still smelt of bacon.

But worse news was yet to come. The pilots would have to spend the night, sharing the bell tents located on the perimeter of the airfield with the "Erks". "We'll never get any sleep in the same tent as a snoring fitter", bemoaned Hollingberry.

As they walked slowly across the smoking airfield, they saw a Bedford OX pulling a Queen Mary turn only the airfield. Not normally an unusually sight, but what was strange and somewhat worrying, was that Cholmondeley Featherstonehaugh was at the wheel.

"What-ho the RAF!", exclaimed Cholmondeley.
 "What you got there?", asked Hollingberry.
 "They look rather tatty, clapped out I'd say old chap", offered Sir Price, "and what happened to the rest of it?".
 "Just you wait and see when the fitters are done.", said Cholmondeley, "Cuckoo clocks you know!".

Result

German Victory

  • Leutnant Fritz von Spy und Spe - Me 110: 1 Kill. 
  • Leutnant Otto von Dasshausen - Bf 109: 1 Kill. 

Sunday, August 19, 2018

Battle of Britain - Scenario 13 - August 15th 1940 – Luftflotte 5 attacks The North

This is the thirteenth scenario in a Battle of Britain campaign that follows the exploits of the fictitious Country of Dampshire 369 Squadron Auxiliary Air Force. We use the Wings of Glory WW2 rules, slightly modified to give faster play, together with our own set of campaign rules. We use the Wings of Glory planes where the right model is available, other manufactures are used to fill in the gaps.

The Background

All three German Air Fleets were to lauch attacks on Britain when the fine weather they had been waiting for arrived on August 15th.

Luftflotte 5 based in Scandinavia launched attacks with He 111 bombers escorted by Me 110 fighters from Stavanger and Ju 88s from Aaborg. Because of the distance involved, the Me 110s left their rear-gunners behind to allow for extra fuel, however this was not expected to be a problem as the Luftwaffe believed that all of Fighter Command was tied up fighting in The South.


The armada consisted of 115 bombers and 35 fighters which approached Britain in two prongs. The incoming bandits were tracked by RDF and RAF fighters were sent to intercept. When the RAF formation leader spotted the bandits, he continued to head out into the sea in order to attack out of the sun. This caused one of his wingmen to ask, “Haven’t you seen them?” In a reply that was to become famous throughout fighter command, the leader said “Of course I’ve seen the b-b-b-bastards, I’m trying to w-w-w-work out what to do!”.

Of the 150 planes sent on the raid, 22 were destroyed, as a result of which Luftflotte 5 never attacked again in strength for the rest of the Battle of Britain.

The Action

Pilot Officer Cholmondeley Featherstonehaugh returned to 369 Squadron after a few days recovering from his wound. Squadron Leader Foxy Moron, the Intelligence Officer could see that Featherstonehaugh was still not fully recovered; he seemed so introvert, just wandering around alone mumbling "Bang! It will work! Cuckoo clocks! Freezing! Bang! Got him!".

Pilot Officer Sir Price was going up to Scotland to visit with some friends from his Dartmouth days. He was going to fly up in the squadron's "Maggie", so Foxy persuaded him to take Featherstonehaugh along for the ride.

Sir Price landed at a RAF Acklington to fuel-up the “Maggie”. The chaps had just hopped out and were on their way to the Mess for a drink when a dozen pilots, rushed out, ran past them, jumped in their planes and scrambled! “What’s all the fuss about?” asked Sir Price.

RDF had detected a large raid of bandits heading in from over the North Sea. “Oh my”, said Cholmondeley, “We can’t do much good in the Maggie”. To which Sir Price replied, “That’s true, but I saw a couple of old Hurricanes parted on the taxiway when I flew over them for landing”. “Jolly good”, said Cholmondeley, “Off we go! Tally Ho!”.

Sir Price in the lead, spotted the Kraut formation. An Me 110 in the lead with a couple of Ju 88s behind. In his excitement, while manoeuvring towards the Germans, Cholmondeley managed to bump into Sir Price damaging both Hurricanes.

Seemingly unaware of the Me 110s frontal firepower, both Hurricanes headed straight towards it. The Me 110 gave Sir Price a nasty burst and then despite Sir Price’s manoeuvrability advantage, the Me 110 managed to get on his tail with an Immelmann.


The Me 110 did for Sir Price while Cholmondeley concentrated on the bombers. Soon smoke was pouring out from the bomber’s engine.


Cholmondeley stubbornly concentrated on the bomber in his sight, its smoking engine then caught fire! The Me 110 turned to try and catch up and protect the bombers.


However Cholmondeley’s luck ran out, and his borrowed Hurricane gave up under the hail of return fire from the bombers.

The fire on the Ju 88 could not be put out, the plane continued flying towards land and as soon as they reached the coast, the crew baled out and were taked prisoner by the local Home Guard. The second Ju 88 continued with its mission, bombed the Coastal Command airfield that was its target and then returned to its base over the North Sea.

Cholmondeley managed to nurse his Hurricane back to base and make a dead-stick landing, which was nearly perfect until he ran out of field and went straight into the hedgerow. Carried away on a strecher, he claimed a kill of the bomber which he had seen in flames.

Sir Price crash landed near the coatline and hit his head on landing. In the ambulance he had a miraculous recovery when he heard the nurses talking about the brave Pilot Officer Featherstonehaugh who'd shot down the Hun in flames. He jumped up, ripped of his bandages and rushed to the airfield where he pointed out that the Hun was his, he'd shot at it first, and Cholmondeley had just sneaked in and taken it from him.

Even the local Home Guard claimed a shot down Ju 88, they had opened fire with their shotguns when the flaming plane flew overhead.

Although the wreckage from only one Ju 88 was found, it was decided to award two kills: one to encourage the Home Guard and one to be shared between Cholmondeley and Sir Price.

Sir Price decided he didn't like Scotland any more, so early the next morning he stuffed the still bleeding Cholmondeley into the back of the "Maggie" and flew back south.

Result

German Victory

  • Pilot Officer Cholmondeley Featherstonehaugh: 1/2 Kill. Wounded by a hedgerow, miss one mission. 
  • Pilot Officer Sir Price: 1/2 Kill. 
  • Me 110: 1 Kill. 
  • Ju 88s: 1 Kill. 

Notes

As the Germans flew this mission from Scandinavia, we used no-name pilots for them.