
The Scenario
We didn't use the standard CCN scenario, but an alternate scenario I wrote. This scenario was inspired by William Barnes Wollen's painting of the battle: Black Watch at Bay.
 |
| Wollen's Black Watch at Bay |
To this end the French lancers have been added and one of Picton's units upgraded to GR to represent the highlanders. Kellermann's Cuirassiers and Cooke's Foot Guards are no longer available at the start of the battle.
The Setup

Quatre Bras is an objective hex for the French player. If a French unit occupies it at the start of the French player's turn, then the French gain 2 Victory Banners. This applies as long as the unit remains on the objective hex. If it moves off or is eliminated, it no longer counts. The French cannot win unless they occupy Quatre Bras. If the British get 9 Victory Banners after the French have already done so but without holding Quatre Bras then the game is a draw.
All reinforcements arrive immediately for both sides when a French unit comes within 5 hexes of the British edge or a British unit (including allies) comes within 3 hexes of the French edge.
The Battle
The battle started when Marshal Ney ordered an artillery bombardment by the French which caused two Dutch-Belgian units light casualties, however they quickly retreated from their hill positions and took cover in the protected ground behind.

Deciding that the position on the hill was too precarious, the Prince of Orange pulled back his remaining Dutch-Belgian and Brunswick units to safety.

Encouraged by the sight of the retreating allies, Ney ordered his infantry to advance through the shallow brook.

The Brunswick artillery opened fire on the French infantry causing casualties.

Upset by the effectiveness of the Brunswick artillery, Ney ordered his light cavalry to lead an attack on the battery.

The Brunswick artillery took serves losses but the French light cavalry was repulsed and retreated back into the brook.

Not one to give up easily, Ney ordered the light cavalry to charge the remains of the Brunswick battery, this time he supported his cavalry with artillery fire. Kellermann was ordered forward in support with his cuirassiers.
The remains of the battery was overrun and the cavalry then charged towards the remains of a Dutch-Belgian infantry unit behind it. The Dutch-Belgian took casualties but managed to form square just in time.

The Brunswick light cavalry, led by their Uhlan squadron, charged over the hill into the flank of the French cavalry. The French retired back to the brook and the Brunswickers decided not to follow.

The French artillery opened fire on the Brunswick light cavalry which retired again behind the hill.

Wellington had now arrived. He ordered the Brunswick infantry into Quatre Bras and their cavalry to move in support. This would leave room to deploy Cooke's Foot Guards.

Seeing the Foot Guards marching in the distance, Ney ordered his infantry to perform a bayonet charge up the ridge. Both the Dutch-Belgian infantry and the Brunswick light cavalry took losses and retreated before the advancing French who now had Quatre Bras in their sights.

Wellington positioned the Foot Guards in the gap between Quatre Bras and Bossu Wood.
The Prince of Orange ordered a Dutch-Belgian infantry unit to attack uphill and take the French on the ridge in the flank. The attack was supported by long range artillery fire from a Royal Artillery battery which had be stationed in reserve.

The French took severe losses but still managed to push back the attacking Dutch-Belgian infantry who had only received light casualties.

The French on the ridge exchanged fire with the Allied. The French loosing that exchange.

Kellermann's cuirassiers moved up across the brook to support their infantry.

The Prince of Orange ordered his Dutch-Belgian infantry up for a second attack against the French on the ridge.

The Foot Guards and the Brunswick infantry in Quatre Bras exchange fire with the French infantry on the ridge, greatly reducing their strength.

Kellermann's cuirassiers charge over the ridge and into Cooke's Foot Guards in the gap between Quatre Bras and Bossu Wood.

The cuirassiers were received by a first volley from the Foot Guards which decimated the cuirassiers. However to do so, the Foot Guards didn't form square which meant they took casualties from the cuirassiers.

The Foot Guards were rallied by Wellington and fired upon the cuirassiers at close range. Half of the remaining cuirassiers fell as casualties and Kellermann retreated with few survivors to the protection of his artillery.

The French moved their infantry to their right in order to attack the lone Dutch-Belgian infantry unit that the Prince of Orange had left unsupported.

While this was happening, Wellington ordered the Foot Guards to advance.

The French continued their attack on the lone Dutch-Belgian infantry unit, this time supported by artillery fire from across the brook.

The French attack was successful and the Dutch-Belgian infantry fled from the battlefield.

The rifles advanced on the Allies' left flank and took up position at the edge of the woods in order to start annoying the French.

The British Foot opened fire on the advancing French after the Dutch-Belgians had fled. The French took casualties but still held the ridge!

Wellington didn't like the threat still posed by the cuirassiers so he ordered his infantry to open fire on them.

The French infantry were rallied by their general and then they charged the waiting British.

The British Foot pushed back the French infantry and then advanced attacking again.

But the French infantry unit was now alone and surrounded by enemy troops. Fire from the surrounding muskets and cannon destroyed the unit and their General fled to safety.
The momentum now left the French attack. They didn't have enough fresh troops to be able to take Quatre Bras. However they had caused the Allies serious casualties too.
Result
Minor Allied Victory.
The Setup

Quatre Bras is an objective hex for the French player. If a French unit occupies it at the start of the French player's turn, then the French gain 2 Victory Banners. This applies as long as the unit remains on the objective hex. If it moves off or is eliminated, it no longer counts. The French cannot win unless they occupy Quatre Bras. If the British get 9 Victory Banners after the French have already done so but without holding Quatre Bras then the game is a draw.
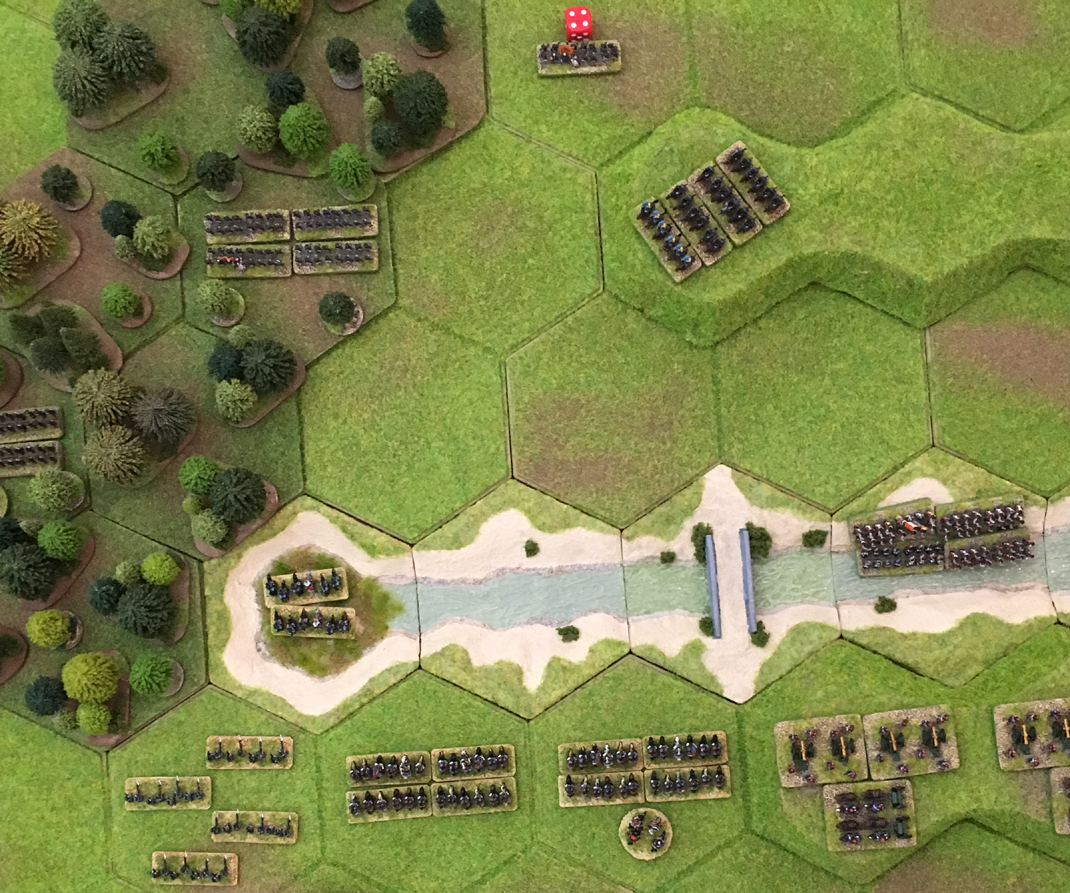
 |
| The battlefield from the east. |
- The British place 2 x GG and 1 x FA in any hex with an orange border.
- The French place 2 x CU and General Kellermann in any hex with an green border.
 |
| British reinforcements - off table |
 |
| French reinforcements - off table |
The Battle
The battle started when Marshal Ney ordered an artillery bombardment by the French which caused two Dutch-Belgian units light casualties, however they quickly retreated from their hill positions and took cover in the protected ground behind.

Deciding that the position on the hill was too precarious, the Prince of Orange pulled back his remaining Dutch-Belgian and Brunswick units to safety.

Encouraged by the sight of the retreating allies, Ney ordered his infantry to advance through the shallow brook.

The Brunswick artillery opened fire on the French infantry causing casualties.

Upset by the effectiveness of the Brunswick artillery, Ney ordered his light cavalry to lead an attack on the battery.

The Brunswick artillery took serves losses but the French light cavalry was repulsed and retreated back into the brook.

Not one to give up easily, Ney ordered the light cavalry to charge the remains of the Brunswick battery, this time he supported his cavalry with artillery fire. Kellermann was ordered forward in support with his cuirassiers.
The remains of the battery was overrun and the cavalry then charged towards the remains of a Dutch-Belgian infantry unit behind it. The Dutch-Belgian took casualties but managed to form square just in time.

The Brunswick light cavalry, led by their Uhlan squadron, charged over the hill into the flank of the French cavalry. The French retired back to the brook and the Brunswickers decided not to follow.
The French artillery opened fire on the Brunswick light cavalry which retired again behind the hill.

Wellington had now arrived. He ordered the Brunswick infantry into Quatre Bras and their cavalry to move in support. This would leave room to deploy Cooke's Foot Guards.

Seeing the Foot Guards marching in the distance, Ney ordered his infantry to perform a bayonet charge up the ridge. Both the Dutch-Belgian infantry and the Brunswick light cavalry took losses and retreated before the advancing French who now had Quatre Bras in their sights.

Wellington positioned the Foot Guards in the gap between Quatre Bras and Bossu Wood.
The Prince of Orange ordered a Dutch-Belgian infantry unit to attack uphill and take the French on the ridge in the flank. The attack was supported by long range artillery fire from a Royal Artillery battery which had be stationed in reserve.

The French took severe losses but still managed to push back the attacking Dutch-Belgian infantry who had only received light casualties.

The French on the ridge exchanged fire with the Allied. The French loosing that exchange.

Kellermann's cuirassiers moved up across the brook to support their infantry.

The Prince of Orange ordered his Dutch-Belgian infantry up for a second attack against the French on the ridge.

The Foot Guards and the Brunswick infantry in Quatre Bras exchange fire with the French infantry on the ridge, greatly reducing their strength.

Kellermann's cuirassiers charge over the ridge and into Cooke's Foot Guards in the gap between Quatre Bras and Bossu Wood.

The cuirassiers were received by a first volley from the Foot Guards which decimated the cuirassiers. However to do so, the Foot Guards didn't form square which meant they took casualties from the cuirassiers.

The Foot Guards were rallied by Wellington and fired upon the cuirassiers at close range. Half of the remaining cuirassiers fell as casualties and Kellermann retreated with few survivors to the protection of his artillery.

The French moved their infantry to their right in order to attack the lone Dutch-Belgian infantry unit that the Prince of Orange had left unsupported.

While this was happening, Wellington ordered the Foot Guards to advance.

The French continued their attack on the lone Dutch-Belgian infantry unit, this time supported by artillery fire from across the brook.

The French attack was successful and the Dutch-Belgian infantry fled from the battlefield.

The rifles advanced on the Allies' left flank and took up position at the edge of the woods in order to start annoying the French.

The British Foot opened fire on the advancing French after the Dutch-Belgians had fled. The French took casualties but still held the ridge!

Wellington didn't like the threat still posed by the cuirassiers so he ordered his infantry to open fire on them.

The French infantry were rallied by their general and then they charged the waiting British.

The British Foot pushed back the French infantry and then advanced attacking again.

But the French infantry unit was now alone and surrounded by enemy troops. Fire from the surrounding muskets and cannon destroyed the unit and their General fled to safety.
The momentum now left the French attack. They didn't have enough fresh troops to be able to take Quatre Bras. However they had caused the Allies serious casualties too.
Result
Minor Allied Victory.
Thank you, that post must have taken ages to put together, very enjoyable.
ReplyDeleteI was fun to play too! I really thought the French would take Quatre Bras this time!
ReplyDeleteGreat stuff, I must try your scenario soon.
ReplyDelete