Sunday, June 27, 2021

Spy Pick-up

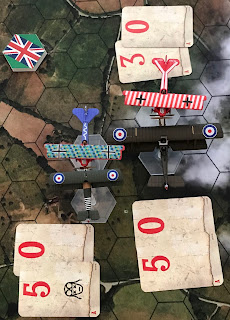
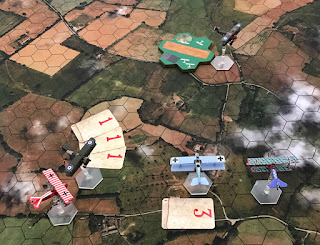
This is an attempt to use Wings of Glory on a hex mat. We use hexes in order to simplify play over the Internet while staying isolated at home. Each aircraft has a number of different manoeuvres it can perform, but instead of being represented by arrows they are represented by hexes traversed.

Army HQ has tasked your squadron to pick up a spy with critical information from behind enemy lines. The spy is hiding out in a Belgium farm to escape the German troops that are out hunting. Your squadron must perform the pick-up at midday from the meadow next to the farmyard.

Army HQ has provided a brand new two-seater Bristol F.2B Fighter (perhaps the first one to arrive in France) for the operation because it is must faster than the DH.4 two-seaters that the squadron is otherwise equipped with. The Brisfit has two forward-firing Vickers machine guns and one Lewis gun in the observer's cockpit. The Brisfit will fly without its normal observer in the back seat in order to make room for the spy.

Lieutenant William Algernon "Billy the Bishop" Tempest bravely volunteers to fly the pick-up in the Brisfit and his friend Lieutenant Terence “the Rook” Turner, flying his Sopwith Camel, will escort Billy. They take off from their aerodrome in good time before noon and head towards the front lines. When crossing the German trenches, they are spotted and an officer telephones to the nearest airfield from which two Fokker D.VII scouts are sent up to intercept.


Special rule:
When the Brisfit’s back seat is occupied by the spy, the Lewis gun counts as being fired by a novice. It may not use aimed fire and if jammed will take an additional “jammed” counter.


As the two RFC planes approached the pick-up point, they spotted two Hun Fokker D.VII scouts.

Turn 1:
The RFC pilots flew straight ahead as the two Fokkers turned towards them.

Turn 2:
The RFC pilots flew straight ahead as the two Fokkers side-slipped towards them.

Turn 3:
The RFC pilots side-slipped to their right and the two Fokkers side-slipped again.

Turn 4:
The RFC pilots flew straight ahead as the two Fokkers side-slipped towards them.

The planes opened fire on their opposite number at long range.

Flying his Sopwith Camel, it wasn't Lieutenant Terence “the Rook” Turner's day. After firing a short burst into the Blue Fokker, his machine-guns jammed, and in the silence he heard his engine starting to make strange and worrying noises.

Turn 5:
The two opposing sides now met head-on at point blank range.

Lieutenant "Billy the Bishop" Tempest exchanged fire with the Red Fokker. The Blue Fokker opened fire on Terence “the Rook” Turner's Camel, tearing holes in the fuselage and wounding him.

Turn 6:
Both Fokker's turned to their right as did Terence “the Rook” Turner who was try to get out of the fight while he unjammed his guns. Billy the Bishop turned the Brisfit towards the meadow.

Turn 6:
Both Fokker's turned to their right. Terence “the Rook” Turner flew out of the fight while he unjammed his guns. Billy the Bishop in the Brisfit descended towards the meadow.

The Red Fokker was now on Billy the Bishop's tail, and open fire with a burst from his two Spandau machine-guns. Smoke started to pour out from the Brisfits engine.

Turn 7:
Billy the Bishop in the Bristfit ignored the Fokker on his tail and continued with his run in to the meadow. Terence “the Rook” Turner flew out of the fight while he unjammed his guns.

The Red Fokker opened fire on the Brisfit.

Turn 8:
With inches to spare, Billy crossed the hedgerow that marked the boundary of the meadow chased by the two Fokkers. Having unjammed his guns, Terrence turned his Camel back towards the fight.

Both Fokkers opened fire. The Blue Fokker did little damage before its guns jammed, but the Red Fokker filled the Brisfit with holes and wounded Bill the Bishop.

From a height of about 10 feet, the Brisfit crashed into the ground.

As the Brisfit crash-landed in the meadow, a nun came out from the hedgerow. The nun looked around carefully and then ran over to the Brisfit. She pulled Billy the Bishop out from the wreckage, through him over her shoulder in a fireman's carry, and disappeared in the direction of the farmhouse.

Flying in his shot-up Camel, Terence “the Rook” Turner saw the fate of his friend. Not wanting to face the two Fokkers, Terrence turned for home vowing to return to pick up both his friend and the spy.


Wednesday, June 16, 2021

Photo Reconnaissance Mission

This is an attempt to use Wings of Glory on a hex mat. We use hexes in order to simplify play over the Internet while staying isolated at home. Each aircraft has a number of different manoeuvres it can perform, but instead of being represented by arrows they are represented by hexes traversed. The R.E.8 was flying using my autopilot rules.

Army HQ is planning a large 3-day bombing raid on targets too far behind the lines for artillery fire to reach. They have ordered photo recce missions from a number of front-line squadrons to determine which targets to attack.

An R.A.F. R.E.8 is fitted with a camera. It will be piloted by Jonathan "Banger" Walls and Sidney Smythe will be the observer, photographer and rear-gunner. St John Somerset and Mathew Winterbottom will fly their Sopwith Camels as escorts.

Scenario rules: The goal is for the R.E.8 to make two passes over the target hex flying straight and level in order to take a photograph. The observer may make no other action that turn. Before making the second run, the observer must change the photographic plate, and on the turn this is done he may not perform any other action. The R.E.8 must exit its board edge to get back with the photographs.

The RFC pilots took off from their aerodrome, and with St John Somerset in the lead they headed towards their target. As they approached, the spotted two Hun Fokker D.VII scouts on patrol.

Turn 1:
Both Sopwith Camels started to accelerate ahead of the R.E.8. The two Fokkers closed up.

Turn 2:
The two Camels continued forward with Mathew Winterbottom on St John Somerset's starboard wingtip. The Fokkers headed straight for them. 

Turn 3:
The two pairs of scouts continued to close, as the R.E.8 started to line up with the target.

The scouts opened fire on each other at extreme range.

St John Somerset's rudder jammed.

Turn 4:
The scouts started dogfighting as the R.E.8 turned back towards the target.

St John Somerset opened up with a burst of machine-gun fire into the Red Fokker which caught fire. Mathew Winterbottom fired into the Blue Fokker at close range, but his Vickers machine-guns jammed before he could do much damage.

Both Fokkers fired into St John's Camel.

St John Somerset's rudder jammed yet again.

Turn 5:
Jonathan "Banger" Walls piloted the R.E.8 straight towards the target, seemingly ignorant of the dogfight going on in front of his nose.

Mathew Winterbottom turned his Camel gently to port, while all the time banging on his machine-guns with a hammer trying to unjam them.

The other three scouts all moved slowly ahead.

The flames shooting out of the Red Fokker were causing damage but it opened fire on St John Somerset at close range. St John fired at the Blue Fokker at long range doing little damage. The Blue Fokker fired at close range into the R.E.8, skilfully judging the angle so that neither the front nor the rear machine gun could target him.

St John Somerset's rudder had now jammed three times in a row.

Turn 6:
With flames still shooting out from its engine, the Red Fokker turned onto the tail of St John Somerset's Camel, who turned to starboard to face the incoming Blue Fokker head on. The R.E.8 dodged to starboard, trying to shake off the Fokkers.

Mathew Winterbottom turned his  Camel gently to port, while all the time banging on his machine-guns with a hammer trying to unjam them.

The flames shooting out of the Red Fokker were causing damage but it opened fire on St John Somerset. St John opened fire on the Blue Fokker which was firing at point blank range into the R.E.8.

Something was seriously wrong with St John Somerset's rudder, it had now jammed four times in a row.

Turn 7:
Mathew Winterbottom turned his  Camel gently to port, while all the time banging on his machine-guns with a hammer trying to unjam them, this time he succeeded.

Winterbottom fired a burst of machine-gun fire into the Blue Fokker.

His guns jammed for a second time, but as he still had his hammer out, he hit them immediately and they started firing again. [Rules note: he actually just remembered that he had the Bullet Checker skill].

Turn 8:;
Mathew Winterbottom got onto the tail of the Red Fokker, The R.E.8 continued towards its target. St John Somerset, circled his bullet-ridden Camel, safely out of range of the Fokkers.

Mathew Winterbottom opened fire on the Red Fokker as Sidney Smythe from the back-seat of the R.E.8. 

The Blue Fokker opened fire at close range on Winterbottom's Camel, but without any success.

The Red Fokker couldn't take this sort of punishment!

Turn 9:
Feeling badly outnumbered, the Blue Fokker tried to side-slip away, but Mathew Winterbottom followed after.

Winterbottom's first burst missed completely, but he adjusted his aim and his second burst had great effect.

The Blue Fokker plunged earthwards.

The two Sopwith Camel formed up behind the R.E.8 as Jonathan "Banger" Walls flew steadily over the target and Sidney Smythe photographed it.

All three RFC planes returned safely to their aerodrome. The two photographic plates were quickly developed to provide Army HQ with the information they needed.

After landing, St John Somerset gave his mechanics a severe dressing down, they had not serviced his tailplane properly. The mechanics promised to use extra grease on St John's tail before his next sortie. 


Wednesday, June 2, 2021

A Roland C.II comes loaded with bombs!

This is an attempt to use Wings of Glory on a hex mat. We use hexes in order to simplify play over the Internet while staying isolated at home. Each aircraft has a number of different manoeuvres it can perform, but instead of being represented by arrows they are represented by hexes traversed. The Roland C.II was flying using my autopilot rules.

The German HQ decided that an early morning raid on the Allied aerodrome was a good way to teach a lesson to the bothersome Brits. A Roland C.II was loaded with bombs and set off just as dawn broke, escorted by a pair of Fokker D.VIIs.

Two RFC pilots, Lieutenants Mathew Winterbottom and Sidney Smythe, were planning on patrolling over the trenches, they climbed into their Sopwith Camels and took off from the aerodrome. Mathew Winterbottom flew his grey-nosed Sopwith Camel with stripes on the fuselage and St John Somerset flew his red-nosed Camel with two hearts painted on the top wing.

As they climbed away from the aerodrome, they spotted the three approaching Hun aeroplanes.

Turn 1:
Mathew Winterbottom slide-slipped his Camel as the other planes flew straight.

Turn 2:
The two Fokkers side slipped away from the Roland, The Roland and the Camels continued straight, 

Turn 3:
The Fokker and Camel scouts met head on as the Roland continues straight towards the target,

They exchanged fire at long range, the Red Fokker started to smoke from its engine.

Turn 4:
Mathew Winterbottom and the Red Fokker met head-on. Smythe turned in to attack the Roland and was himself attacked by the Blue Fokker.

Mathew Winterbottom and the Red Fokker exchanged bursts at close range. Sidney Smythe fired at the Roland, and its observer returned fire. The Blue Fokker fired into Smythe at close range.

Turn 5:
Mathew Winterbottom and the Red Fokker danced around each other hoping for an advantage, The Roland turned right trying to dodge Sidney Smythe's incoming Camel. The Blue Fokker got onto the Camels tail,

The Camel and the Roland had a near miss mid air. [when they should have ended movement in the same hex, each received an A damage card].

Both the Fokker and the Roland opened fire at short range, Flames started shooting out from the Camel's engine.

Lieutenant Sidney Smythe's Camel tumbled earthwards, another kill for the dastardly Hun.

Turn 6:
Lieutenant St John Somerset hearing the approaching Huns, dropped is bacon sandwich and ran from the Officers' Mess to his Sopwith Camel. Behind him, the squadron mascot Toby pounced on the bacon sandwich. St John's Camel raced down the runway and took off.

Mathew Winterbottom turned his Camel to attack the Roland. The Roland and one Fokker headed towards the target while the second Fokker attacked Winterbottom.

The Red Fokker opened fire on Mathew Winterbottom at close range. The Roland's observer opened fire at Winterbottom's Camel at long range and he returned fire.

Turn 7:
Having taken off, St John Somerset turned his Camel to face the Blur Fokker head-on. The Roland continued towards its target, Mathew Winterbottom dodged to the right, so the Red Fokker didn't get in a shot.

St John Somerset and the Blue Fokker exchanged devastating bursts of machine-gun fire close range, with Somerset being wounded. 

Turn 8:
St John Somerset turned in to attack the Roland, bravely ignoring the Blue Fokker behind him. Mathew Winterbottom turned onto the tail of the Roland, determined to attack regardless of what the Red Fokker did.

Mathew Winterbottom and St John Somerset both opened fire on the Roland, Smythe's machine-guns jammed.

Both Fokkers opened fire on the Camels, and the machine-guns in both Fokkers jammed!

The observer in the Roland returned the fire from St John Somerset.

The Roland could take no more damage, a shared kill to Mathew Winterbottom and St John Somerset.

Turns 9 and 10:
The dogfight became somewhat confused, when 3 out of 4 aircraft had jammed machine-guns.

Turn 11:
St John Somerset turned onto the tail of the Blue Fokker. Mathew Winterbottom med the Red Fokker head-on.

Luckily St John Somerset had managed to unjam his machine-guns, so he opened fire on the Blue Fokker, causing it to catch fire.

Mathew Winterbottom opened fire on the Red Fokker, but its pilot was still trying hard to unjam his guns, and thus couldn't return fire.

This was too much damage, the Red Fokker could fly no more, one kill for Mathew Winterbottom!

Turn 12:
The Red Fokker, no on fire, turned in a desperate attempt to fight St John Somerset, but couldn't manage to unjam its machine-guns.

St John Somerset opened fire, wounding his opponent.

This was too much damage, the Blue Fokker could fly no more and crashed one the outskirts of the aerodrome, one kill for St John Somerset!

Both RFC pilots landed safely to the congratulations of the whole aerodrome and the adulation of Toby, who immediately lifted his leg and peed on the starboard wheel of St John Somerset's Camel.