Sunday, May 13, 2018

Battle of Barrosa in 6mm

Refight of the Battle of Barrosa 5 March 1811, using Commands & Colors Napoleonic Rules. Figures from Baccus, hex terrain from Kallistra, houses from TBM, trees from Timecast and river homemade.

Background:

In early 1811, the French were engaged in a no-win siege against the Allies in the port of Cádiz. The French under Marshal Victor were not strong enough to reduce the port without a French sea blockade. After Soult drew off 8,000 of Victor’s men for his invasion of Extremadura, the Allies saw an opportunity to raise the French siege using their sea power to land 14,000 British, Spanish and Portuguese troops on the coast south of Cádiz. If Victor remained in his siege lines, he would be trapped between Cádiz and the relief force. If he chose to fight the relief force, it would give the Cádiz garrison the opportunity to sortie and destroy the siege lines.

Victor soon learned of the Allied approach. He hoped to ambush the Allied column as they advanced, but the Allies advanced in strength and Graham’s British division occupied Barrosa Ridge. Spanish General la Peña gave him a second opportunity, ordering the Spanish and British north now that communication had been established with Cádiz. A rearguard of several Spanish battalions remained on Barrosa Ridge.

Victor jumped at the opportunity and ordered Ruffin’s division to attack the ridge with Leval’s division advancing on his right. At the first sight of the French, the Spanish battalions bolted. Graham received news that the French were attacking and chose to disobey orders. While la Peña entrenched, Graham sent Dilkes’ Guards brigade to retake the ridge and Wheatley’s brigade to attack Leval. Dilkes’ brigade came into contact with Ruffin’s French battalions of infantry and grenadiers still advancing in column. The two forces engaged in a murderous firefight with British line firepower gaining the ascendancy. The gallant Ruffin was killed and his division retreated off the ridge. Meanwhile Wheatley’s brigade advanced against Leval’s division. Another firefight between a British line and French columns resulted in French defeat.

The Allies gave away the victory. Graham urged a new round of attacks to unhinge the French siege line – exactly what Victor feared would happen. General la Peña instead ordered a withdrawal back into Cádiz. Marshal Victor could not believe his good fortune and immediately re-established his siege lines. Other than confirming the valor of the soldiers on both sides, the battle had been a colossal waste of life.
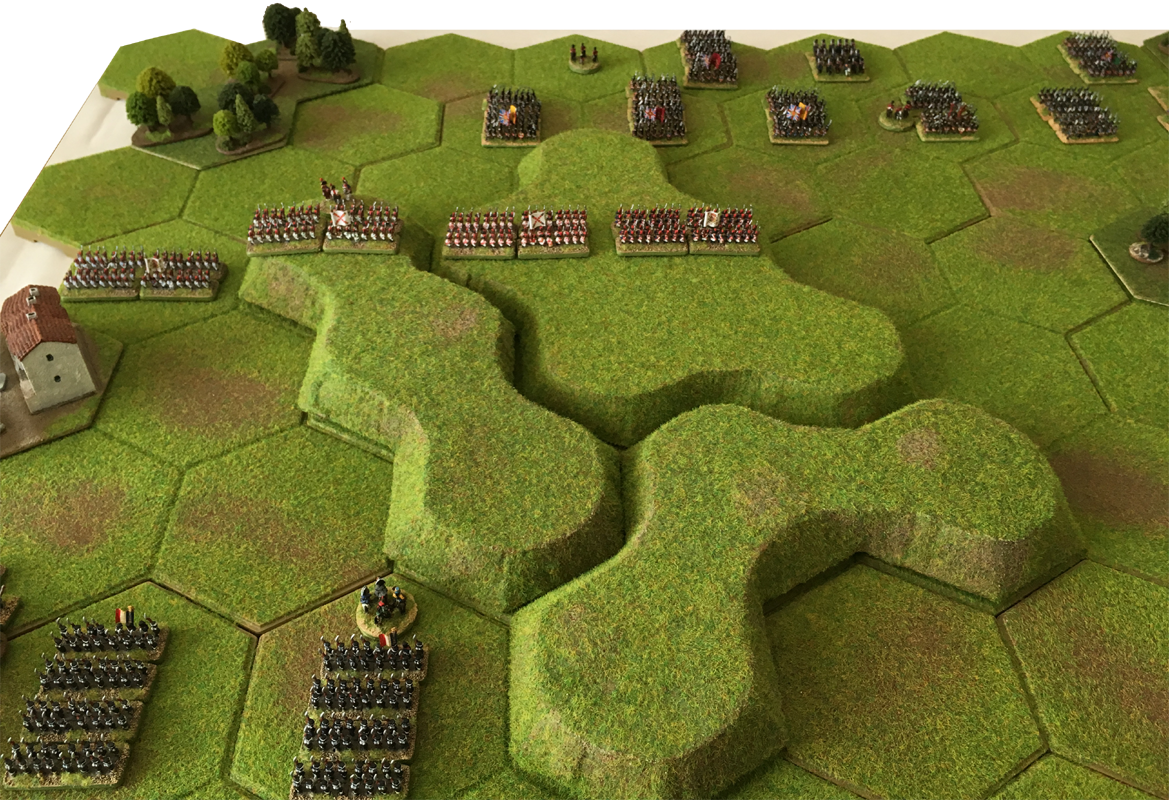
The Setup:


View of the battlefield showing the Allies to the left and the French to the right.


The Action:

General Sir Thomas Graham decided to start the offensive on his right flank and take the important Barrosa ridge before it could be occupied by maréchal Victor's French troops..


Graham took the initiative and pushed forward José de Lardizábal's Spanish infantry to hold the town of Barrosa and at the same time brought up the British 1st and 3rd Foot Guards in support of the Spaniards.


The French counterattacked the Spanish in the town...


...but instead of a bayonet charge, they opted to open fire instead. The combined fusillade caused the Spanish to retreat from the town with losses.


At the same time, the French pushed forward their artillery to cover the ridge. The British 2nd Hussars advanced, but the threat was hidden from the artillery by the woods.


The French pushed their light infantry into the vacated town. However brisk fire from the ridge caused the French line infantry to retire.


The British light cavalry then charged the French artillery in their flank. Was this ordered by the General or was it just another impetuous charge by a cavalry colonel.


The cavalry charge should have been a brilliant success, but the French saw them just in time and could react with some of their guns. The fight was long and drawn out, the French took casualties but the British cavalry took even heavier losses and were forced back.


The French were exchanging fire with the Allies in the vicinity of Barrosa town. While this was going on, Graham took the chance to push forward his Spanish infantry and British 1st Foot Guards to take all of Barrosa ridge.


At the same time, General Dilkes at the head of his infantry, charged the artillery that had just repulsed the 2nd Hussars.


Seeing the infantry approaching, the French artillery withdrew from their exposed position back into the line of battle.


Having returned to the relative safety of their original position, both batteries then opened up on Dilkes' advancing infantry. Dilkes was killed and his troops decimated by the hail of cannon fire.


The 1st Foot Guards went on the attack from Barrosa ridge, causing the French casualties and they retreated.


However the French quickly rallied and brought up their grenadiers to support their counter-attack which inflicted casualties on both the 1st Foot Guards and the Spanish.


The British attack continued with the British 3rd Foot Guards joining the fray and the Spanish following on behind in support.


But not disheartened, the French counter-attacked with two units of grenadiers and one of line infantry performing a bayonet charge.


This bayonet charge resulted in a large number of casualties. The 3rd Foot Guards timed their volley perfectly, and decimated a unit of French grenadiers before they could get into melee.


Meanwhile in the centre of the battlefield, three companies of the 95th Rifles came out from the woods hoping to distract the French attackers.


The 95th miscalculated the aggressiveness of the French grenadiers who immediately charged.


The grenadiers caused the 95th to retreat hastily with serious casualties. At the same time, the French line infantry, supported by artillery fire, assaulted the Spanish on Barrosa ridge and routed them.


The colonel of the 3rd Foot Guards saw his chance, the French column was so engrossed with the routing Spaniards that they had left their flank wide open; the 3rd charged straight into the French flank.


Having seen off the 95th, the French grenadiers returned, supported by their artillery, to deal with the Foot Guards.


The grenadiers, with luck and supported by artillery, took the 3rd Foot Guards unaware and inflicted many casualties.


Both Foot Guards regiments charged like madmen; the 1st Guards attacked the grenadiers while the 3rd Guards went for the artillery. The Guards contacted and mayhem ensued.


When the combat was over, both sides were weak and exhausted but the French just a little more so than the Allies. The French decided to withdraw and leave the field to the British who claimed a victory.

Comment:

I am not sure how well this scenario reflects the actual battle, and one day I plan to write a scenario that reminds me more of the battle itself. However this scenario is fun to play and fairly well balanced. 

Thursday, May 10, 2018

Battle of Albuera in 6mm

Refight of the Battle of Albuera, 16 May 1811, using Commands & Colors Napoleonic Rules. Figures from Baccus, hex terrain from Kallistra, houses from TBM, trees from Timecast and river homemade.

Background:

The Fortress of Badajoz dominated the southern invasion route from Portugal into Spain. The British had invested the fortress, but had few engineers and no siege train to speak of. The French were not idle. Marshal Soult set out toward Badajoz with a relieving force. Beresford, the temporary army commander, marched a force larger than Soult’s to the small town of Albuera to meet the French. Beresford placed his army on the ridge behind Albuera, expecting to receive a frontal assault to split his army. Soult, however, formed most of his army behind the high ground opposite the Spanish on the right flank.

On the morning of May 16th, General Godinot’s brigade attacked Albuera as a diversion, while Soult’s main force moved unobserved across the Albuera River and delivered a flank attack upon Blake’s Spanish contingent. The first Spanish unit attacked was Zayas’s division, a veteran unit under a good commander. Though pounded by superior French forces, the Spaniards held until Stewart’s British division arrived. Stewart threw Colborne’s British brigade at the French flank and checked French progress, but none of Colborne’ regiments were in square. French cavalry charged and virtually destroyed three of the four regiments. The rest of Stewart’s division went into line behind the embattled Spaniards. The French made a fatal pause to allow a fresh division to come forward. Zayas’s survivors drew off under no pressure. Now a solid line of British muskets awaited the French columns that had been successful against Zayas. As the fresh French and British formations met, both did fearful execution to each other at close range, British line fire prevailed, causing the battered columns to retreat. French reserves (Werle’s division) advanced toward Stewart’s remnants, but help was coming. Sensing disaster, General Cole advanced his British division without orders. His action won the battle, as British line fire triumphed over the French columns, but again at a high cost in British casualties. Soult could see Harvey’s fresh Portuguese division advancing, and with no more fresh troops available, ordered a French retreat.

Although considered a British victory, when Wellington heard he had lost almost 6,000 irreplaceable British soldiers, he was reported to have said, “Another such battle will ruin us."

The Setup:

View of the battlefield showing Allies to the left and French to the right.


The Action:

The French started their attack by crossing the river behind the cover of woods and a ridge in order to take Blake's Spanish troops in the flank.


French dragoons charged the infantry on the flank of the Spanish line. The Spanish had good discipline and formed square to hold off the cavalry. However they were then attacked by the French light infantry coming up through the woods; the Spanish square was decimated by the French light infantry.


The Spanish infantry defending their right flank didn't last for long under the pressure from French combined arms. However the did give Blake enough time to pull back the other infantry onto the ridge behind and he was reinforced by some Royal Horse Artillery.


Général Girad brought up the Polish lancers and French light cavalry to support the Dragoons. Blake sent the Granaderos de Fernando VII (a light cavalry unit despite their name) to attack the French Chasseurs à Cheval. Losses were equal in the fight that ensued.


The charge of the Spanish cavalry had left the horse artillery unprotected. Général Girad led the Polish lancers in a charge at the guns. The guns were surprised and the lancers rode over them with minimal losses. Only a few guns managed to limber up and retreat to their rear; the rest were lost.


The lancers continued their charge, heading at the flank of the Spanish infantry, but these formed square after receiving heavy losses.


The British tried to bring up their infantry from their other flank to stop the French. While this was happening the Polish Lancers charged the British Heavy Dragoons which immediately counter-charged. The Dragoons lost more heavily than the lancers.


The British infantry arrived, and with support from the few remaining horse artillery guns, were able to push back Girard and the Polish lancers.


In safety, behind the ridge, Girard rallied the lancers, ready to fight again.

Général Girad then ordered a full out cavalry charge by all his cavalry.


Unluckily for the Allies, General Stewart took over command just at that moment from his hilltop position. He ordered the infantry to advance and receive the cavalry charge in line instead of forming square.


The British infantry and the Spanish infantry as well as the remaining RHA were destroyed. The few Spanish infantry in square on the ridge were looking very lonely.

General Stewart counter-attacked with his infantry, and the French pulled back their cavalry.


The French now decided that they needed infantry support; a bayonet charge by the supporting infantry was called for.


The Spanish light infantry and square were wiped out by the bayonet charge.


Without Wellington in command, the Allies were confused and demoralized. They retreated from the battlefield. It was not "A Close Run Thing" at all!

Sunday, September 24, 2017

Battle of Lindenau in 6mm

Refight of the Battle of Lindenau, 16 October 1813, using Commands & Colors Napoleonic Rules. French figures from Baccus and Austrians from Adler, hex terrain from Kallistra, houses from TBM and trees from Timecast.

Background:

Gyulai’s Austrians were on the left bank of the Pleisse River, to the west of Leipzig. Although ordered to attack, the main intent of his demonstration was to take pressure off the fighting on the right bank and possibly draw off some French reserves. For Napoleon, Lindenau was the only plausible withdrawal route for his entire army, yet the Allies did not grasp the obvious, and chose not to reinforce Gyulai.

At 5 am the Austrians moved against Bertrand’s prepared French IV Corps. This corps had been in action since August and had been much weakened, but the soldiers now fought like veterans. A short cavalry clash sent the French cavalry screen back, but the Austrian cavalry could not overrun the French earthworks.

Around 10 am Austrian artillery was moved into position on the heights and began to bombard the French earthworks, but with little effect. The Austrian infantry, by this time, had pushed the French back to Plagwitz and Lindenau, and for a short time had even gained part of the villages.

A renewed French counter attack, supported by reinforcements, expelled the Austrians and drove them back to almost where they had started the battle.

The Setup:

We removed some of the villages on the Austrian base edge because we didn't have enough model buildings to represent these and they have no effect on the battle.


Reinforcements:

At the start of each turn, the French player makes a reinforcement roll using 3 dice. This determines what, if any, reinforcement unit that can be placed onto the bridge hex. The bridge hex must not have a unit on it for the reinforcement unit to be placed.

Reinforcement roll:

  2 Infantry symbols = one Line Infantry unit
  3 Infantry symbols = one Light Infantry unit
  2 Cavalry symbols = one Light Cavalry unit
  3 Cavalry symbols = one Heavy Cavalry unit
  2 Artillery symbols = one Foot Artillery unit
  3 Artillery symbols = one Horse Artillery unit

Any other die roll symbol combination yields no reinforcing unit

The Battle:

The battle started with an Austrian attack on the French left flank. The French had a good position in the village and this combined with the necessary of fighting through the woods was too much for the Austrians.


The Austrians had left their light cavalry unsupported in the centre, so the French took the opportunity to attack an destroy them, but themselves taking casualties too.


The Austrians tried to take back the initiative by attacking the French right flank.


While at the same time even attacking on the French left flank.


General Morand entered the fray at the head of the French infantry in the village, and yet again the Austrians were defeated and pushed back.


The fighting on the French right intensified with both sides pushing forward more troops.


The Austrian Jaegers crept forward to the edge of the wood and started to bring a heavy fire to bare on the French defenders.


The French responded by clearing the woods with a bayonet charge.


But they took heavy losses from the Austrians supporting the Jaegers.


The Austrians made one last big effort, but couldn't shift the French defenders.


Now the Austrians were exhausted, and the French redoubts in the center still stood firm. A good victory for France!


Battle Of Britain - Scenario 1 - May 10th 1940 – The End of the Phoney War

This is the first scenario in a Battle of Britain campaign that follows the exploits of The Country of Dampshire 369 Squadron Auxiliary Air Force, a fictitious squadron that didn't exist during the Battle of Britain. We use the Wings of Glory WW2 rules, slightly modified to give faster play, together with our own set of campaign rules. We use the Wings of Glory planes from Ares where the right model is available, other manufactures are used to fill in the gaps.

The Background

May 10th 1940 was the day the real war started and the Phoney War ended. It was today that Hitler’s armoured divisions launched their Blitzkrieg attack in the West. The same day, in the United Kingdom, Neville Chamberlain resigned as Prime Minister and was succeeded by Winston Churchill and a new Coalition Government.


The Action

One Hurricane Mk I (Pilot Officer Cholmondeley Featherstonehaugh) and one Dewoitine D.520 (Sous-lieutenant Napoleon Schickelgrüber) were sent up to patrol just behind the front lines. The Hurricane belonged to the Royal Air Force (RAF) and the Dewoitine to the Armée de l'Air (French Air Force) so there was no possibility for cooperation or communication between them. Two Messerschmitt Bf 109 E-3s (Oberleutnant Sepp Schlangenaugen & Leutnant Adolf Halland) flying westwards spotted the Allied planes and dived to attack.

A dogfight occurred where the Germans had an advantage because they were flying in their Rotte as a pair, while the two allied pilots were flying uncoordinated.


Seeing the Dewoitine diving in flames, Schlangenaugen claimed a kill, but unbeknownst to him Schickelgrüber managed to coax his still smoking Dewoitine back to the nearest airfield.

The Result

German Victory - both opponents fled.

  • Oberleutnant Sepp Schlangenaugen: 1 kill

Sunday, September 3, 2017

Wings Of Glory WW2 targets

I have been making some more targets for my Wings of Glory / Wings of War WW2 game. More fun using models as targets than just target cards.

IRREGULAR MINIATURES

Vehicles in 6mm from Irregular may not be as detailed as those from GHQ but they are much cheaper and work great as targets.

German vehicles

British vehicles

HALLMARK SHIPS

Hallmark (sold by Magister Militum) have a range of 1:1200 ship models. A scale that fits nicely on a target card. I will be using these for refighting the early stages of the Battle of Britain; the kanalkampf when the Luftwaffe attacked shipping in the English Channel.

SS Kylebrook (Collier)

SS Holme Force (Tramp)

SS Fulham (Flat Iron)

SS Broomfield (Tramp)

HMS Azalea (Flower class Corvette)

HMT Inkpen (Hill class Admiralty trawler)


Kylebrook towing a barrage balloon (made from modelling clay) 

Thursday, February 9, 2017

Sails Of Glory: A first test with autopilot

This was basically a simple scenario on the open ocean with two British 74's (HMS Vanguard and HMS Bellona) meeting two French 74's (Generaux and Commerce de Bordeaux). They start at opposite ends of the game mat, both sides in line astern and beating into the wind.

We use the Sails Of Glory rules.

The scenario was made interesting, when we chose to sail one British 74 each and let the French sail on the "autopilot" rules written by Herkybird. These rules are simple to use and surprisingly effective although we amended them somewhat during this test.

Once the ships near each other, you determine what the "autopilot" ship does, by using a combination of...

  • the direction of the nearest threat - using a simple "clock" system
  • the distance to the nearest threat
  • if the "autopilot" ship is on fire
  • a D6 die roll
The two forces approach each other and battle commences.
The leading French ship (Commerce de Bordeaux) could rake the leading British ship (HMS Bellona) using it's forward starboard guns. Although the rules say "autopilot" ship will not fire with only their forward guns, we quickly amended them to allow this when it is a short range rake.

The ships closed and HMS Bellona fired a first broadside into Commerce de Bordeaux.
Commerce de Bordeaux replied using continuous fire (another rules amendment we made).

Now HMS Vanguard and Generaux join the fight.
While Commerce de Bordeaux misses her chance to turn downwind and rake the British.

HMS Bellona turns into the wind to tack, while managing a stern rake on the Generaux.
HMS Vanguard and Generaux exchange shots from their rear cannons.

The ships are now no longer within cannon shot, but HMS Bellona successfully completes her tack and goes in chase of the French. 
HMS Bellona pursues the French. HMS Vanguard decides to gibe rather than risk tacking.

The French turn back towards the British in an attempt to get back into cannon shot. They probably should have done it the previous turn but we missed that sentence in the "autopilot" rules.

Commerce de Bordeaux opens fire on HMS Bellona, but luckily she wasn't in a position to rake, and her previous damage made the fire less effective.

The ships are now at close quarters, the musket fire from the Royal Marines was especially effective. At this moment, the battle still hung in the balance, all four ships were damaged. Was it the skill of the British captains, or perhaps luck, that at this critical moment caused both French ships to catch fire? We suspect it was the extreme close range that allowed burning wadding from the British cannons to catch the French ships alight.

HMS Bellona raked the stern of the Commerce de Bordeaux while HMS Vanguard poured a broadside into her port side. On fire and with a serious leak the Commerce de Bordeaux settled slowing into the Ocean. On fire and with many crew killed and wounded, the Generaux was having trouble fighting the fire.
We stopped the game there, with a convincing British victory. The Generaux will be chased down by the British ship, while she is fighting the fire, she will be boarded and taken back to Portsmouth as a prize. The victory was without a doubt won more by luck than the skill of the British Captains. That however won't be mentioned in the letter sent to the Admiralty, and when printed in the Gazette both British Captains will be national heroes.